Swim in the slow lane with this super cute No-Sew Crochet Turtle pattern! Ready to meet your super chilled out bestie? This adorable little turtle is the latest addition to my Jelly Bean Amigurumi Collection! Perfect for advanced beginners and beyond, this free pattern is as easy as a turtle sliding into the sea on a summer’s day. With clear instructions and a helpful full video tutorial, you’ll be stitching baby sea turtles for yourself and gifts – in different colours, all year long! This cute crochet turtle is easy to make and comes with a handy video tutorial, to follow along with!
What is a No-Sew Amigurumi Pattern?
Who says crafting has to be complicated? The No-Sew Crochet Turtle is proof that simplicity can be downright adorable. This little guy is perfect for those who prefer to focus on the fun of creating stuffed animals, without the fuss of finishing by weaving in yarn ends! Imagine the satisfaction of crafting a cuddly companion in record time!
There’s so many playful options for this little sea turtle softie to swim into your life!
The ‘Jelly Bean’ Sea Turtle amigurumi is shown using Hobbii Honey Bunny (similar to Premier Parfait Chunky), (light super bulky (6)).
Feel free to experiment with your favourite Amigurumi yarns as well! Check out this post for some guidelines on how.
This crochet no sew crochet turtle pattern also includes a Full Video Tutorial!
Tips to Make A Small Turtle Amigurumi Gift
Looking to create a truly special gift? Consider crafting adorable, mini turtle amigurumi! Customize them with bright colors that match your giftee’s personality or preferences. Not only are these little creatures irresistibly cute, but they’re also a fantastic way to use up leftover scrap yarn, making them a budget-friendly and eco-conscious choice. With endless color combinations and customization options, you can create a unique turtle for every occasion, turning your crafting hobby into a thoughtful gift-giving idea.
Don’t want to wait for the rest of the Jelly Bean Sea Creatures to be released on the blog?!
The rest of the Jelly Bean Ocean Animal Collection, will be making their appearance on the blog over the next couple months. In the meantime, if you’re wanting the get started on the rest of the Jelly Bean 7 Sea Creature Crochet Pattern Bundle is ready to go!
All this cuteness is available NOW, in the Jelly Bean 7 Sea Creature Crochet Pattern e-book! This crochet pattern collection includes instructions to create the sea turtle, octopus, seahorse, squid, angelfish, goldfish, and crab !

Want to stay up to date on all the Darling Maple Designs happenings? Be sure to subscribe to my newsletter ![]()
Thank you so much for being here and crocheting with me ![]()
Please share your work by tagging me on FB or IG @darlingmapledesigns or use #darlingmapledesigns for a chance to have your work featured in my IG stories! ![]() Sara
Sara
If you love the crochet Sea Turtle pattern? You’ll simply adore the rest of the ‘Jelly Bean’ Sea Creature crochet patterns – which are all no-sew, free amigurumi patterns too! Many of them being beginner friendly!
Goldfish
Angelfish
Seahorse
Octopus
Sea Turtle
Squid
Crab

Interested in more cute crochet patterns? Check these out!
The Premium PDF version of this pattern in now available and includes a convenient printable format, plus lots additional photos.
What you will need to make your Jelly Bean No Sew Crochet Turtle Pattern
[A detailed, step-by-step pattern with clearly written instructions and easy to follow video tutorial]
Materials:
Hook size 5.0 mm (H)
Yarn – Hobbii Honey Bunny
| Yarn – Light Super Bulky (6)- Hobbii Honey Bunny or Premier Parfait Chunky | ||
| Main Colour: Jungle Green | 12 yards | |
| Accent Colour: Cool Blue | 10 yards | |
| Optional Accent Colours: White medium worsted weight | small amount | |
- Polyester filling – small amount
- 2 – 10mm black safety eyes (not suitable for children under 3): See video for embroidering eyes as an alternative.
- Stitch Markers or Safety pins to help with sewing placement
- Yarn needle to weave in the ends
Gauge: 4 Rounds of Gauge Pattern = 2.0 inch diameter
Gauge Pattern: Create a Magic Ring
Round 1: 6sc in the ring (6)
Round 2: 2sc in each st (12)
Round 3: *sc, 2sc* 6 times (18)
Round 4: *sc in the next 2 sts, 2sc* 6 times (24)

All of these Materials can be found in my Amazon Storefront shops
Abbreviations:
| ch | chain |
| dc | double crochet |
| hdc | half double crochet |
| RS | right side |
| sc | single crochet |
| scdec | single crochet decrease |
| ss | slip stitch |
| st(s) | stich(es) |
| trc | treble (triple) crochet |
| *to* | repeat the sequence between the ** the number of times indicated |
| WS | wrong side |
| YO | Yarn Over |
Special Stitches & Techniques:
Magic ring
Crocheting the Shell to the body
Eye Embroidery
Eye Highlights
Treble (Triple) Crochet – YO twice, insert hook, YO, pull up loop, *YO pull through 2 loops* twice
Notes:
- #sc, eg. (2sc, 3sc, etc) shows the number of scs to be completed in the indicated st
- Sts listed between brackets are all worked in the same st, eg. (hdc, dc)
- I highly recommend using a stitch marker to help keep track of the rounds for the body/head
Recommended Sequence: It is highly recommended to complete the Jelly Bean Sea Turtle in the order written.
Start your Jelly Bean Sea Turtle Crochet Pattern:
Head:
The head is worked in continuous rounds.
Using the Main Colour, create a Magic Ring
Round 1: 6sc in the ring (6)
Round 2: *2sc* 6 times (12), mark the first st of Round 2 to help with eye placement.
Rounds 3-4: sc in each st (12)
Place the head on a flat surface with the opening facing away from you and the last stitch worked at the far right hand side (left if left handed). Place the safety eyes between rounds 2 and 3 of the head approximately 5 sts apart. |
Round 5: *scdec* 6 times (6)
End off, weave in end. Stuff lightly and flatten the head, place a stitch marker through the last st worked and next unworked stitch.
Body (bottom of the shell):
The body is worked in continuous rounds.
Using Main Colour, create a Magic Ring
Round 1: 8sc in the ring (8)
Round 2: *2sc* 8 times (16)
Round 3: *sc in the next 7 sts, 2sc* twice (18)
Note: FLO refers to the next st only in Round 4, all instructions within brackets ( ) are to be worked in the same front loop.
| Round 4: Place the head in front of the body with the marked set of sts on the right hand side (left if left handed). Working through BOTH sides of the head (set of marked sts) and the next stitch on the body, sc in the next st. Continue working through BOTH sides of the head and body, sc in the next 2 sts. Working through the body only, sc in the next st, FLO (ss, ch1, hdc, dc, trc, ch3, ss), sc in the next 3 sts, FLO (ss, ch2, dc, ch2, ss), sc in the next st, FLO (ss, ch2, ss), sc in the next st, FLO (ss, ch2, dc, ch2, ss), sc in the next 3 sts, FLO (ss, ch3, trc, dc, hdc, ch1, ss), sc in the last st (13 sts + 5 BLO) | |
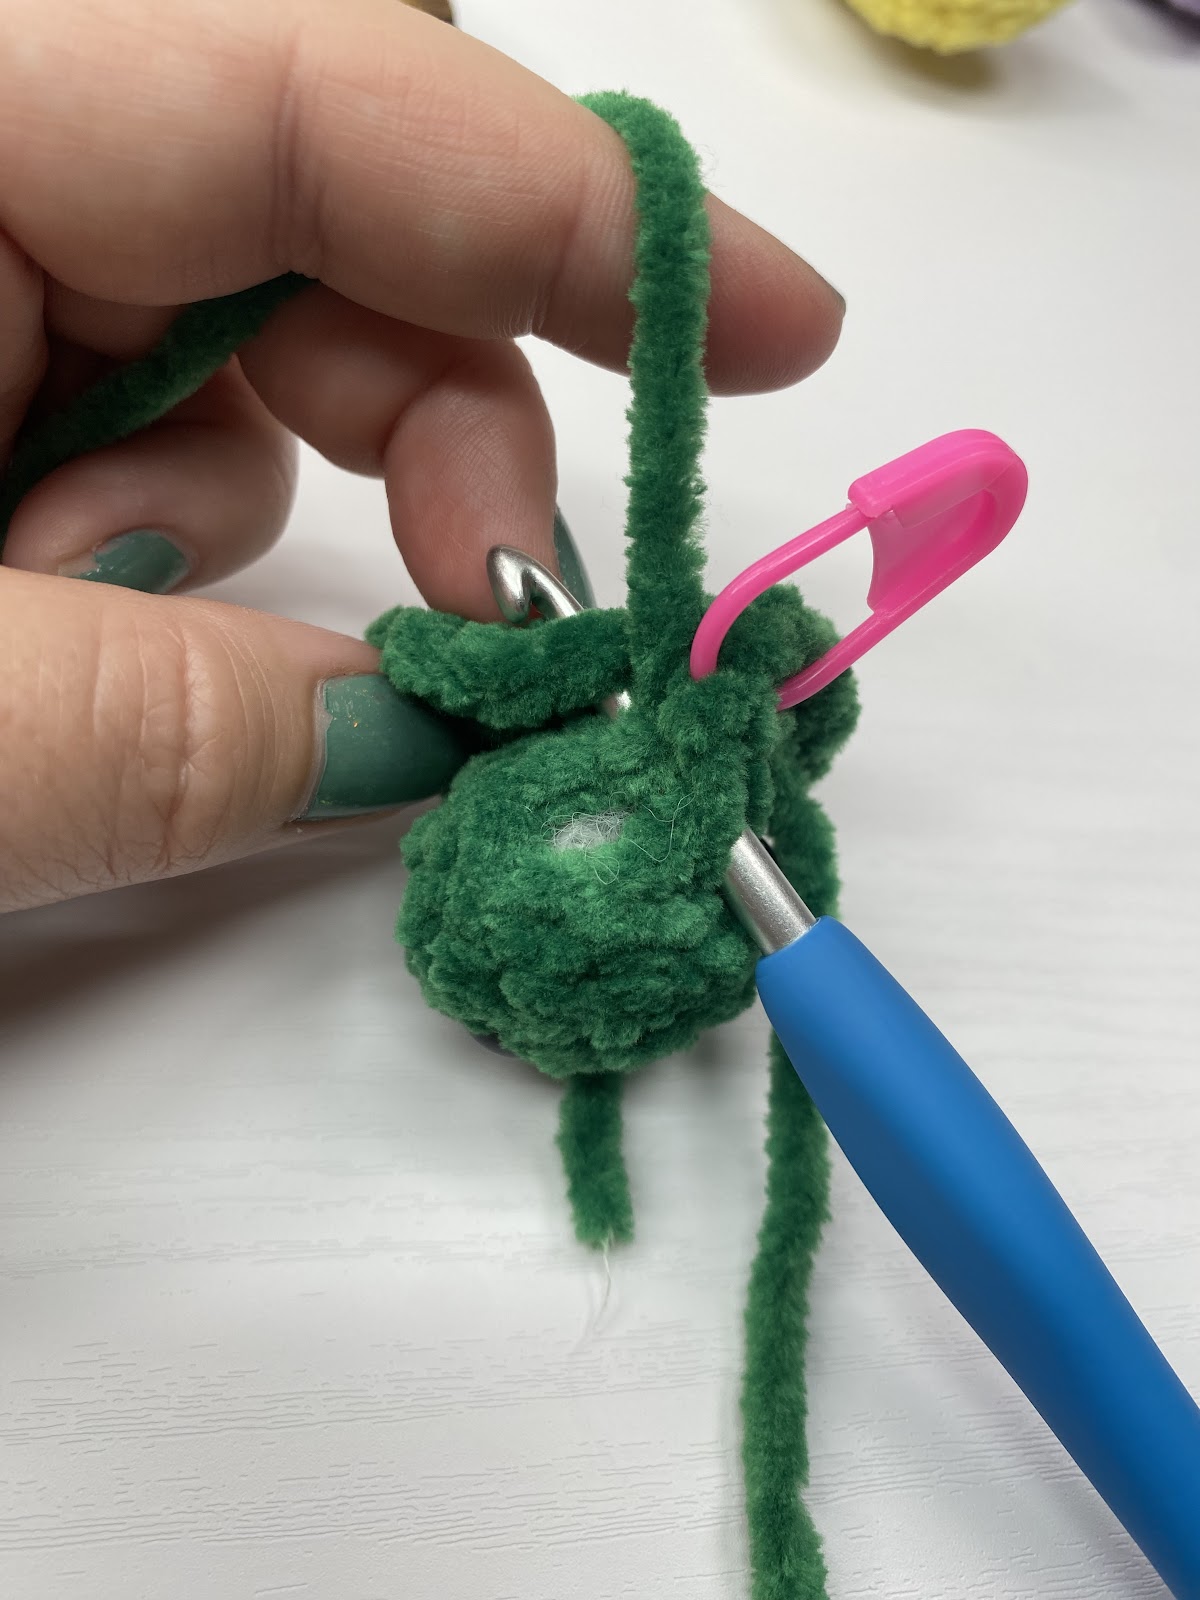 | |
| Round 5: (RS) sc in the next 4 sts, sc in the BLO, sc in the next 3 sts, *sc in the BLO, sc in the next st* 3 times, sc in the next 2 sts, sc in the BLO, sc in the last st (18) End off, weave in end | |
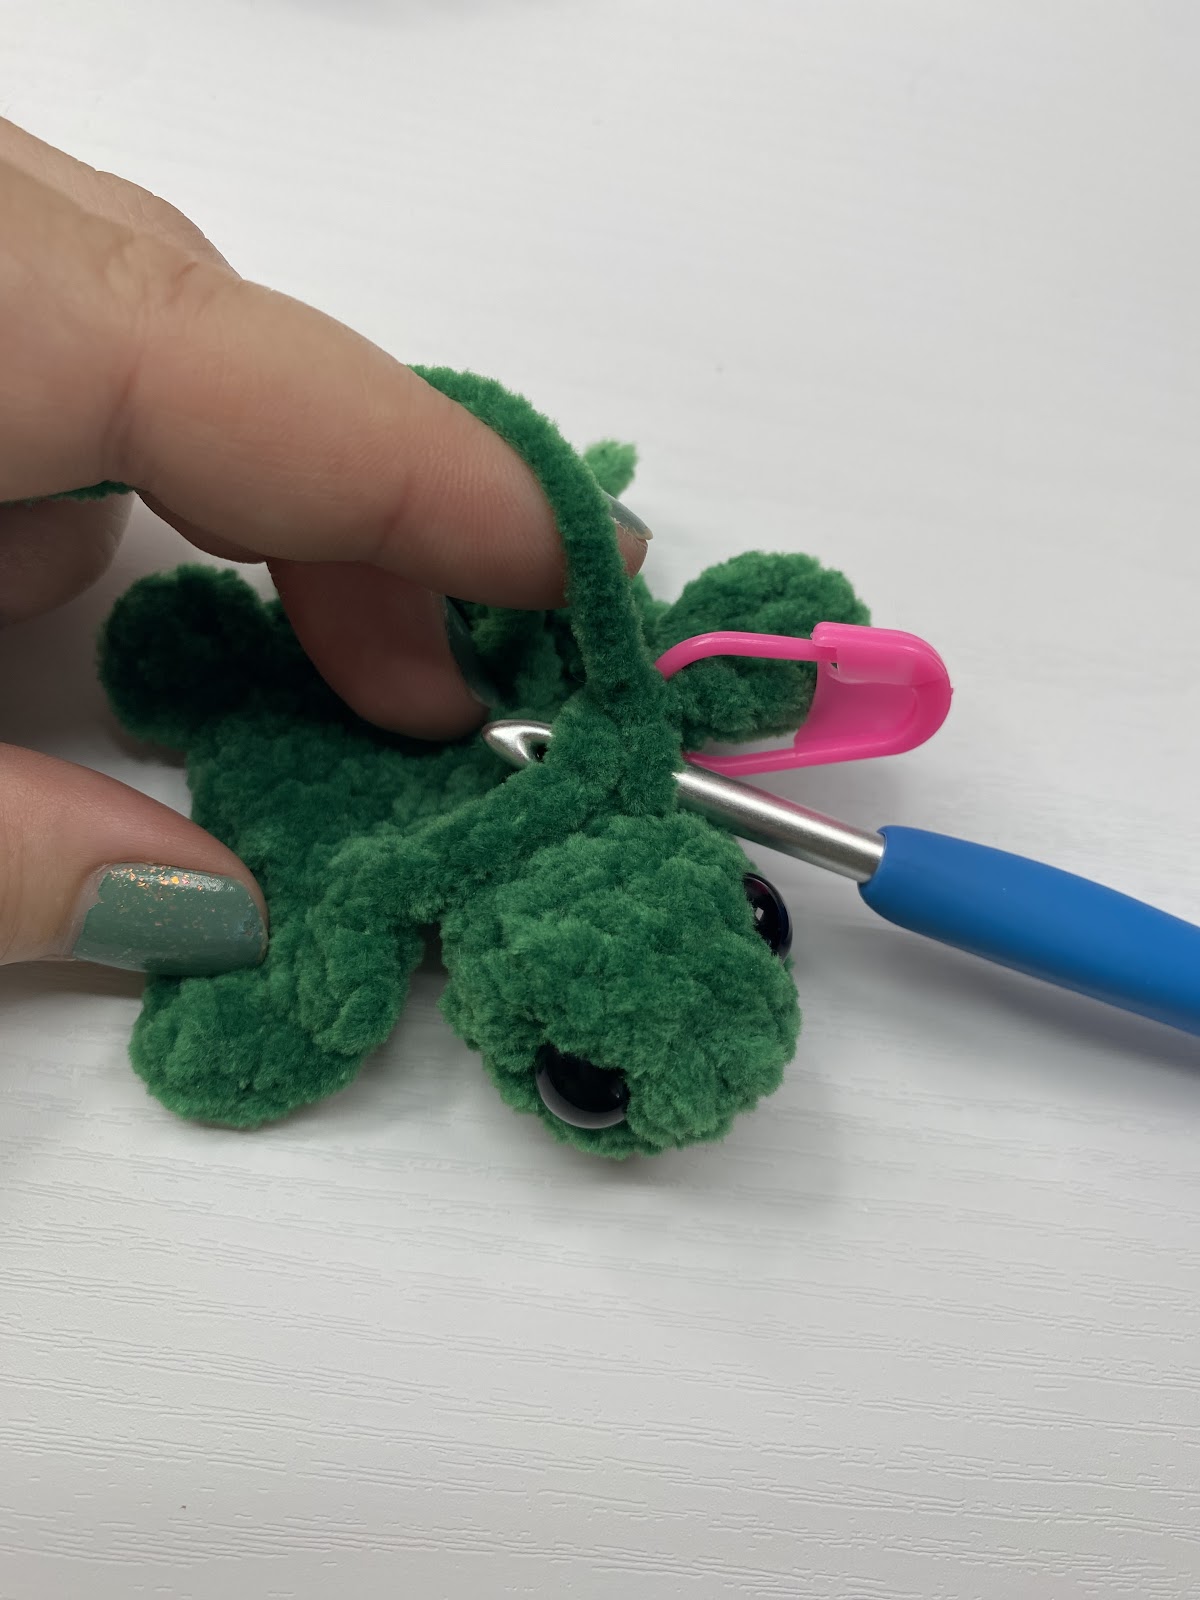 |
Shell (top of the shell):
The shell is worked in continuous rounds. The body is crocheted into the shell at Round 5 of the shell (6 of the body).
Using Accent Colour, create a Magic Ring
Round 1: 6sc in the ring (6)
Round 2: *2sc* 6 times (12)
Round 3: *sc in the next st, 2sc* 6 times (18)
Round 4: (RS) sc in each st (18)
| Round 5: With the RS of the body and shell facing out. Place the WS of the body and shell together. Line up the stitches. Work through both pieces all the way around. *2sc* in each st (36)Stuff the body as you work Round 5.End off, weave in end. | |
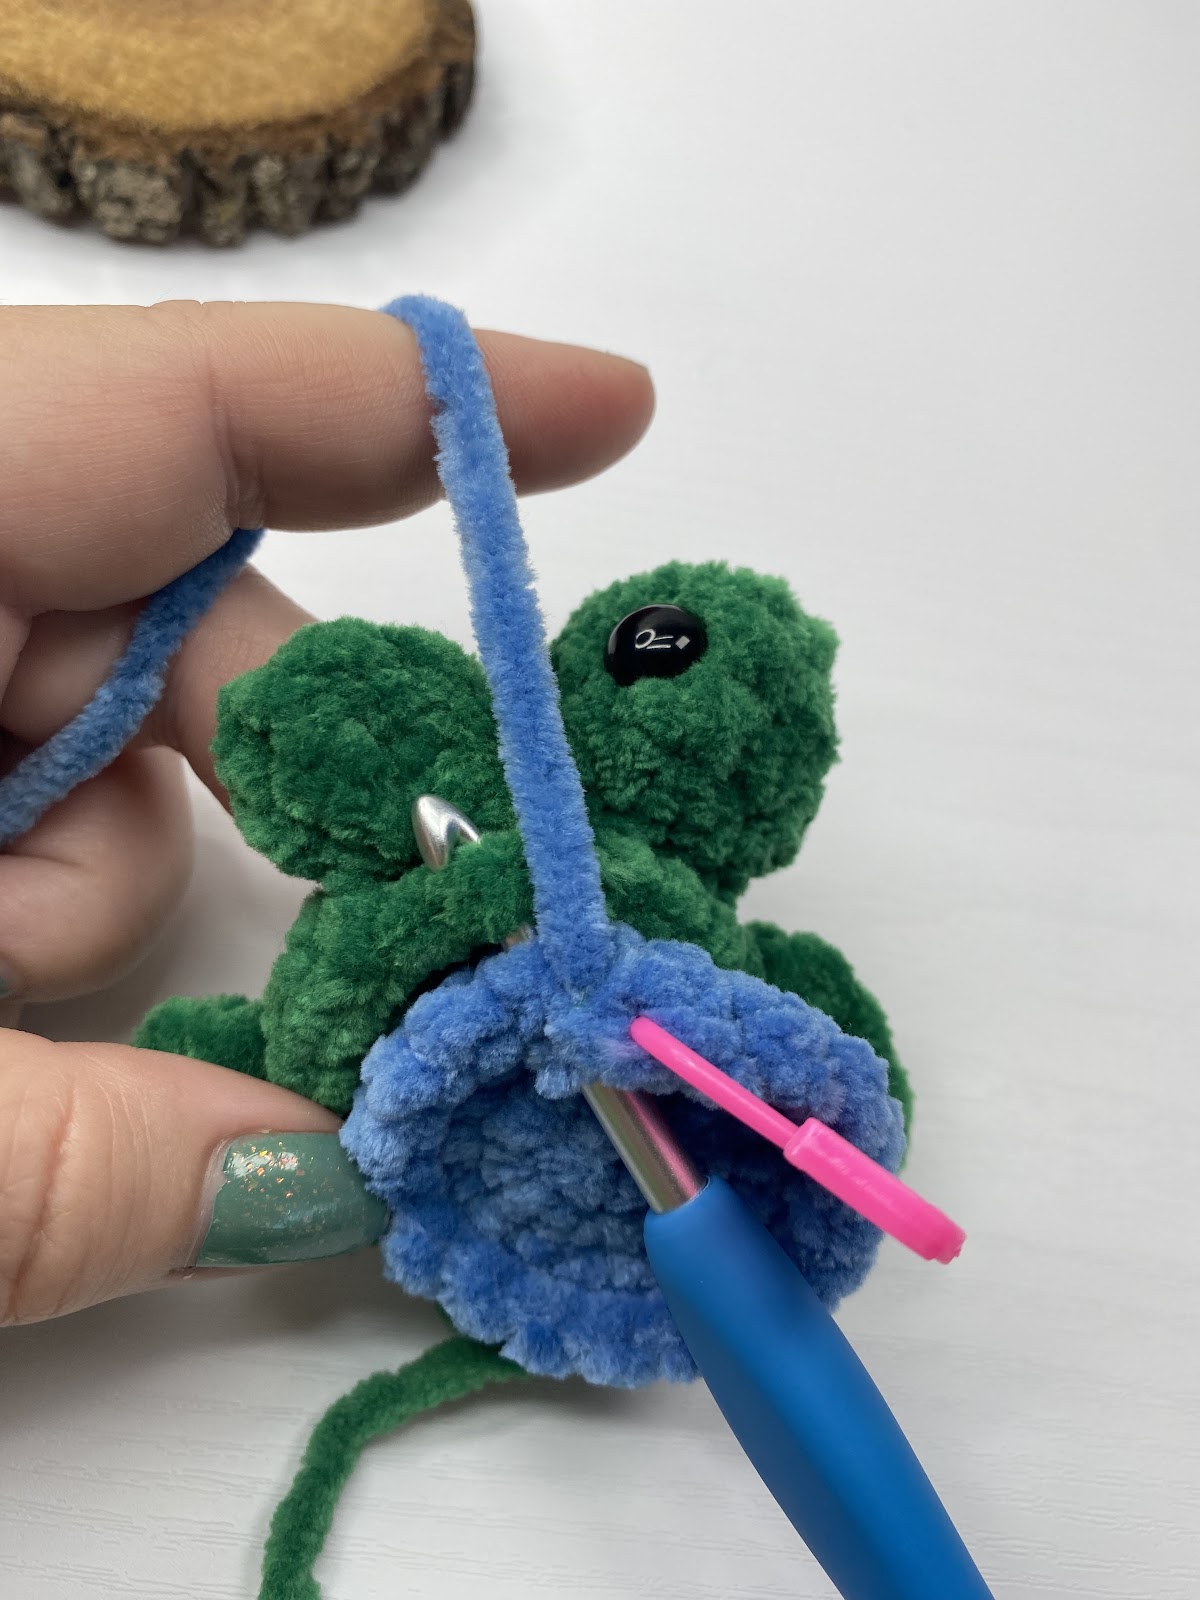 |
Sewing Placement –
| Eye Details: Follow video for optional eye detail. Video | 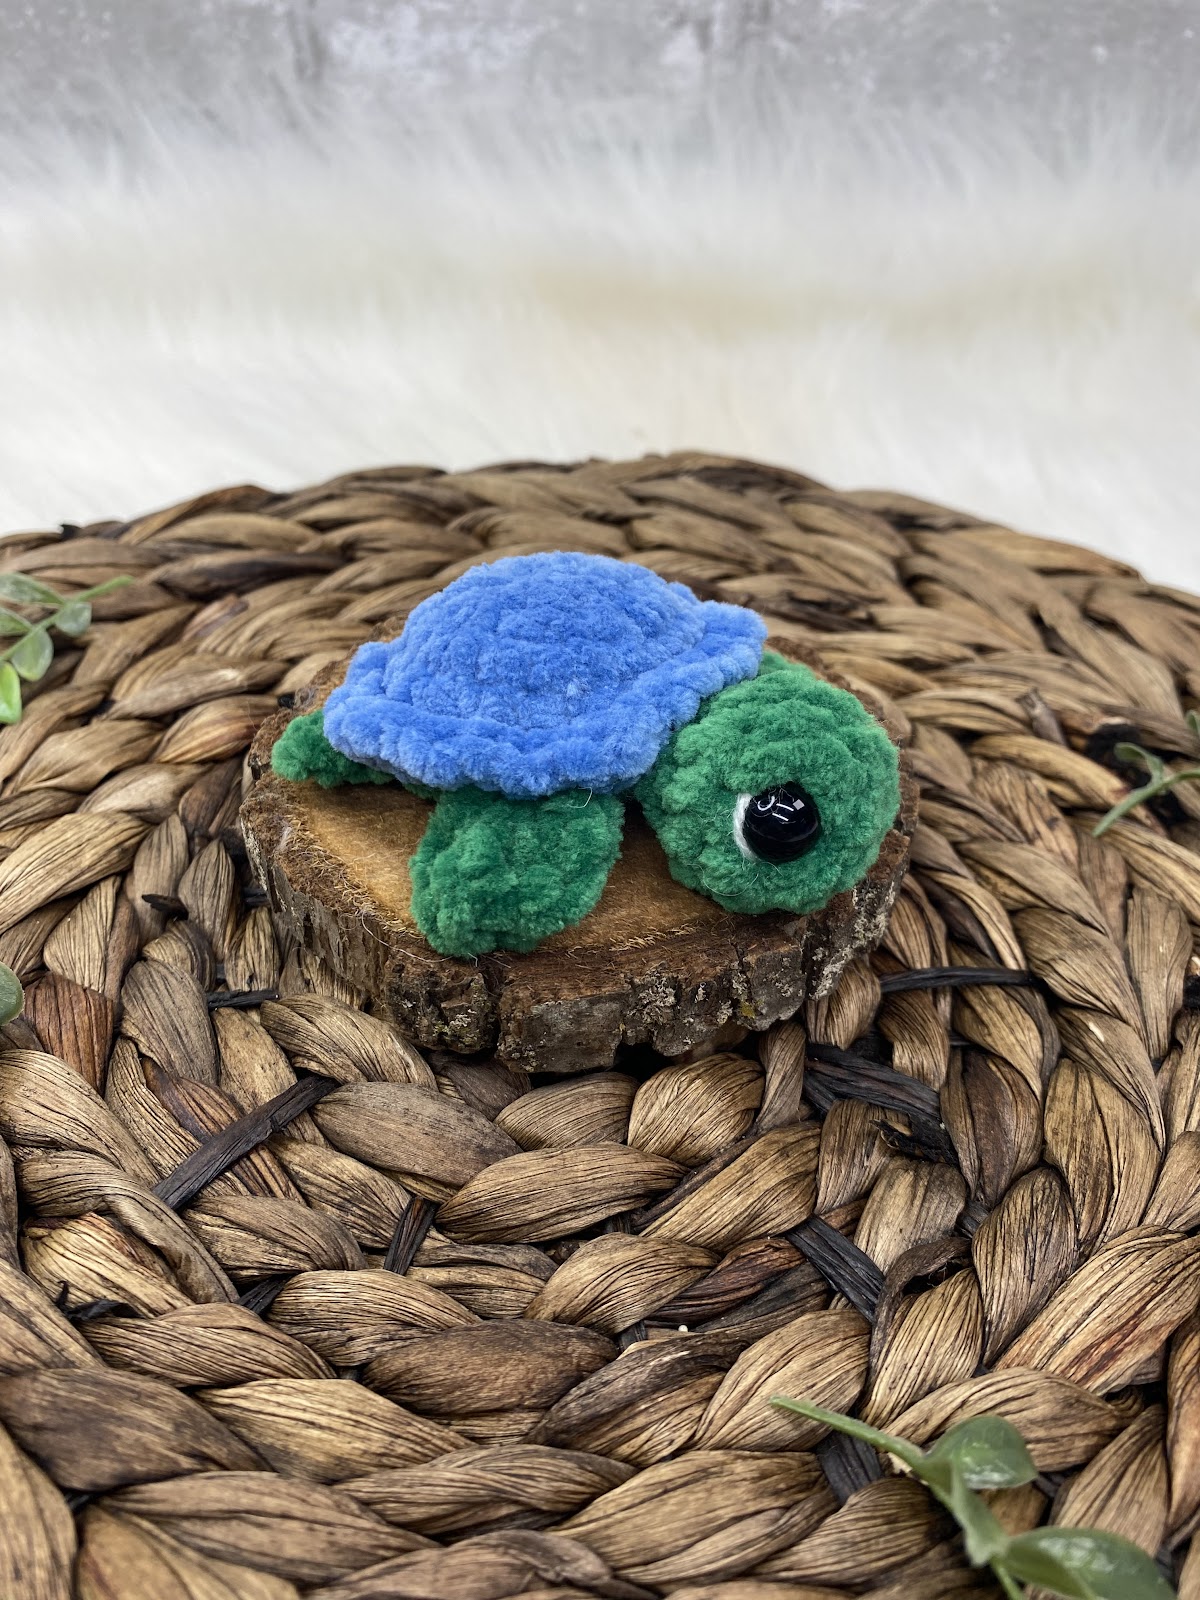 |
We love seeing your finished projects. Tag us in your photos and posts using #DarlingMapleDesigns or @DarlingMapledesigns.
Congratulations!
You have now completed your Jelly Bean No Sew Crochet Turtle Pattern!
Head over to my Sea Turtle Plush Round-up for even more free pattern inspiration, on these majestic creatures.
We love seeing your finished projects. Tag us in your photos and posts using #DarlingMapleDesigns or @DarlingMapledesigns.
There’s something really special about bringing a cute crochet creature to life. Trust me, I’ve designed and made so many of them, I know how addictive it can be! Once you’ve made a few, you’ll be hooked! This adorable No Sew Crochet Turtle can be customised with different colours of yarn – and can be made with any weight of yarn, for a different effect. Which additionally makes this a great pattern for scrapbusting!
Thank you so much for joining us! I hope you loved completing your Jelly Bean Sea Turtle Amigurumi as much as I enjoyed designing it. Don’t want to miss a stitch? Subscribe to the Darling Maple Designs newsletter and I’ll send updates for new pattern releases, sales and promotions straight to your inbox. See you again soon! Sara <3
If you have any questions or concerns with this, or any other pattern written by Darling Maple Designs, please do not hesitate to contact me at: info@darlingmapledesigns.com.
Don’t forget to Pin it to your project board.


