Learn to crochet the Lil’ Loops Snowman crochet pattern! This free amigurumi design makes creating your own soft n squishy Snowman, fun and easy. Even beginners can follow along with the step-by-step, full video tutorial! With its low-sew design and adorable finish, it’s a must-make project for the holidays. This free pattern is perfect for crafting for markets, gifts, or adding to your holiday home décor.
Perfect for Gifts, Decor, and More
The Lil’ Loops Snowman is an excellent choice for anyone on your gift list. Hang it on the Christmas tree with a candy cane, use it as an unique present topper, or share it as a thoughtful classroom gift. Its compact size and cuteness means it will be cherished by all who receive one.
Make Your Own Lil’ Loops Snowman Crochet Pattern
This snowman crochet pattern is made using Hobbii Honey Bunny yarn (similar to Premier Parfait Chunky), giving it a soft and cuddly finish. If you prefer, experiment with your favourite amigurumi yarns to create a unique look. The pattern is designed with 10.5 mm flat black safety eyes, but instructions for embroidering sleepy eyes are included for younger children.
This pattern also includes a full video tutorial!
Check out the Lil’ Loops Snowman pattern below or grab the inexpensive ad-free PDF on Ravelry or Etsy
Why You’ll Love the Lil’ Loops Holiday Collection
All the patterns in this low-sew amigurumi collection, are designed to work up quickly with minimal sewing. The body and head are crocheted in one piece, while the limbs are seamlessly added as you go. These time-saving techniques make it easy to create adorable holiday characters like this snowman.
Check out the Lil’ Loops Snowman pattern below or grab the inexpensive ad-free PDF on Ravelry or Etsy
Get the Complete Lil’ Loops Holiday Collection
Want all five Lil’ Loops Holiday patterns at your fingertips? The Lil’ Loops Holiday Collection E-Book brings together the Reindeer, Snowman, Santa, Gingerbread, and Christmas Tree patterns in one easy download. Grab the Ad-free, 5 Pattern Lil’ Loops Holiday Collection E-Book on Ravelry or Etsy!

Want to stay up to date on all the Darling Maple Designs happenings? Be sure to subscribe to my newsletter ![]()
Thank you so much for being here and crocheting with me ![]() .
.
Please share your work by tagging me on FB or IG @darlingmapledesigns or use #darlingmapledesigns for a chance to have your work featured in my IG stories! ![]() Sara
Sara

Interested in more cute crochet patterns? Check these out!
What you will need to make your Free Lil’ Loops Snowman Crochet Pattern
With step-by-step written pattern and free video tutorial included!
Materials:
| Yarn Used: | Light Super Bulky (6) Hobbii Honey Bunny (yarn substitutes Premier Parfait Chunky, Himalaya Dolphin Baby) | |
| Hook Size: | 5.0 mm (H) | |
| Main Colour | 30 yards White | |
| Accent Colours | ||
| Black, Bordeaux (Red), Gold Dust, Jungle Green (small amount of each) | ||
| Optional: Black and White Embroidery Thread (or medium weight yarn) | ||
| Polyester filling | small amount | |
| Black safety eyes | 2 – 10.5mm | |
| (not suitable for children under 3) see video for embroidering sleepy eyes as an alternative. | ||
| Stitch Markers or Safety pins | ||
| Yarn needle to weave in the ends | ||
| Gauge: 4 Rounds of Gauge Pattern | 2.0 inch diameter | |

Gauge Pattern:
Create a Magic Ring
Round 1: 6sc in the ring (6)
Round 2: 2sc in each st (12)
Round 3: *sc, 2sc* 6 times (18)
Round 4: *sc in the next 2 sts, 2sc* 6 times (24)
Abbreviations:
| ch | chain |
| hdc | half double crochet |
| sc | single crochet |
| scdec | single crochet decrease |
| ss | slip stitch |
| st(s) | stich(es) |
| *to* | repeat the sequence between the ** the number of times indicated |
| YO | Yarn Over |
Special Stitches & Techniques:
Magic ring – https://youtu.be/ayek4XfmDvM
Full Video Tutorial Available – https://youtu.be/T8wZLPuYrNs
- Attaching Legs: https://youtu.be/T8wZLPuYrNs?si=Smss8UBM2loHG2JR&t=827
- Attaching Arms: https://youtu.be/T8wZLPuYrNs?si=Smss8UBM2loHG2JR&t=1488
- Sleepy Eyes – https://youtu.be/4kO0XAkXMGo
Notes:
- #sc, eg. (2sc, 3sc, etc) shows the number of scs to be completed in the indicated st
- Sts listed between brackets are all worked in the same st, eg. (hdc, dc)
- I highly recommend using a stitch marker to help keep track of the rounds for the body/head
Recommended Sequence for the Lil’ Loops Snowman Free Crochet Pattern:
It is highly recommended to complete the Lil’ Loops Reindeer pattern in order, as written.
Start your Lil’ Loops Amigurmi, Free Crochet Snowman Pattern
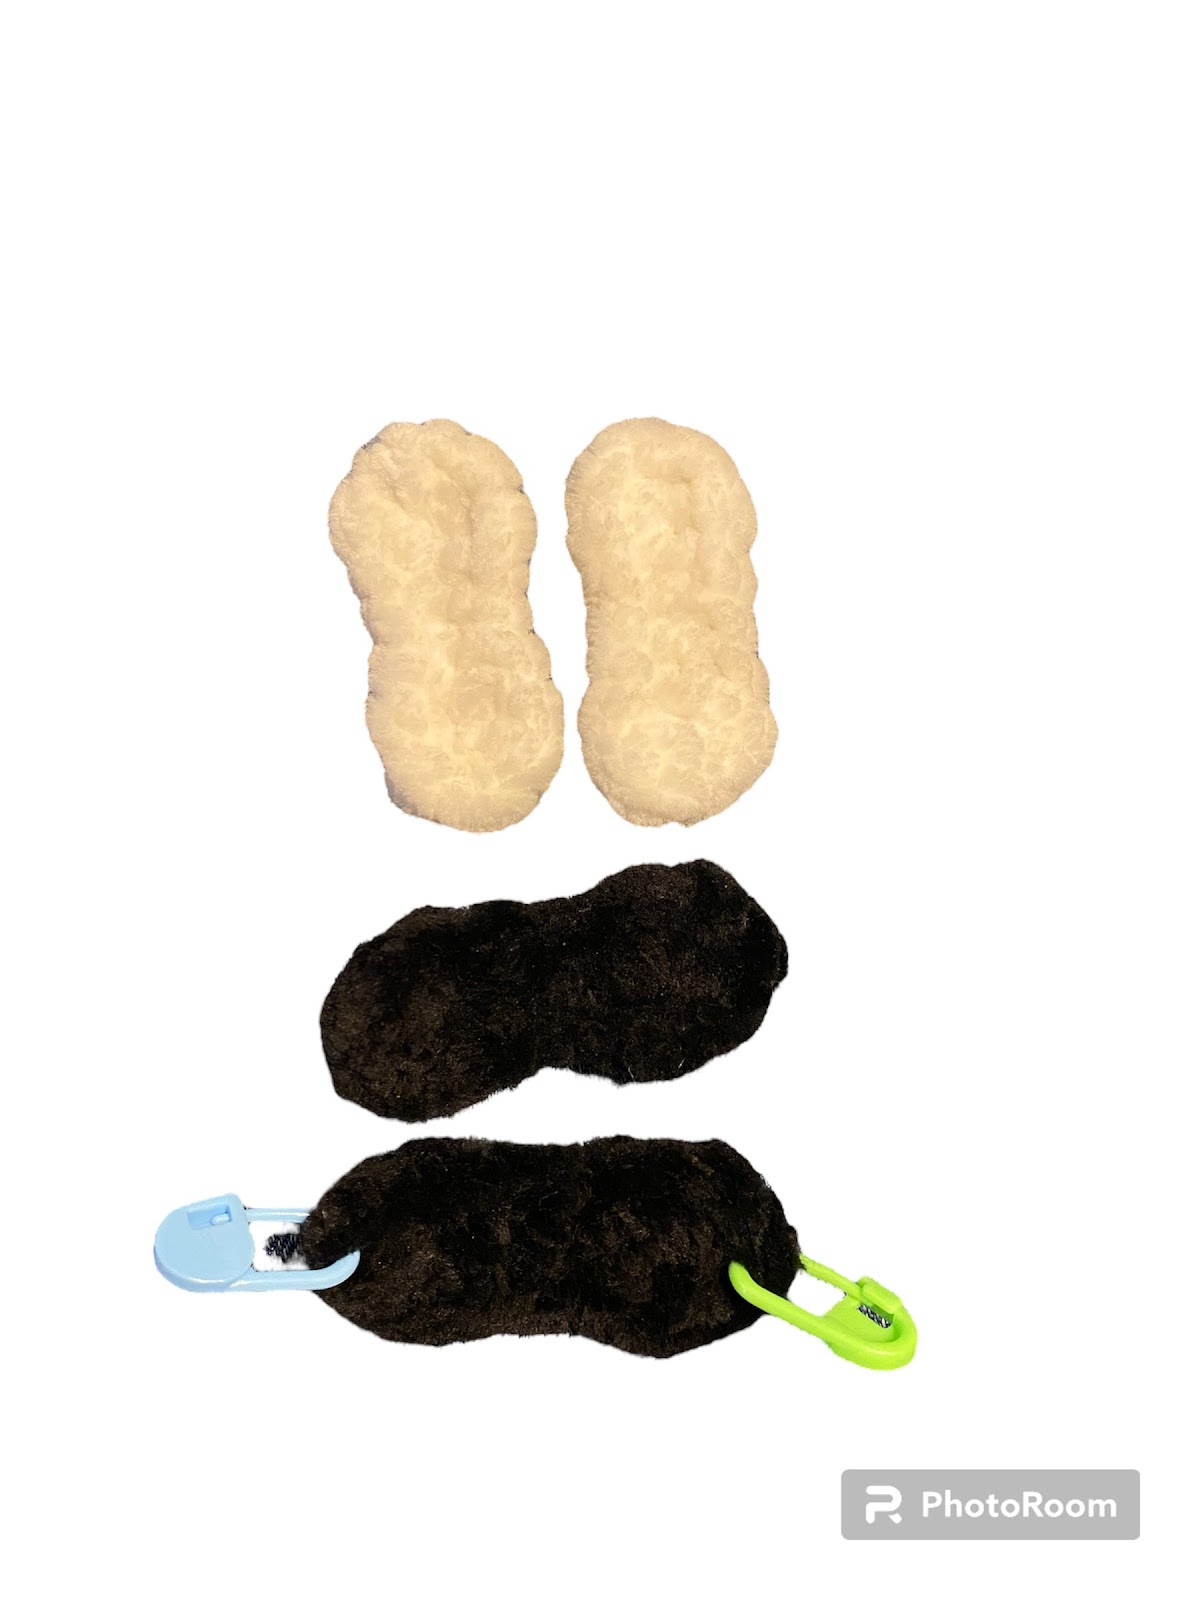
Lil’ Loops Snowman Arms/Legs (Make 2 White and 2 Black): The arms are worked in 1 joined oval round.
Using White or Black, ch 6
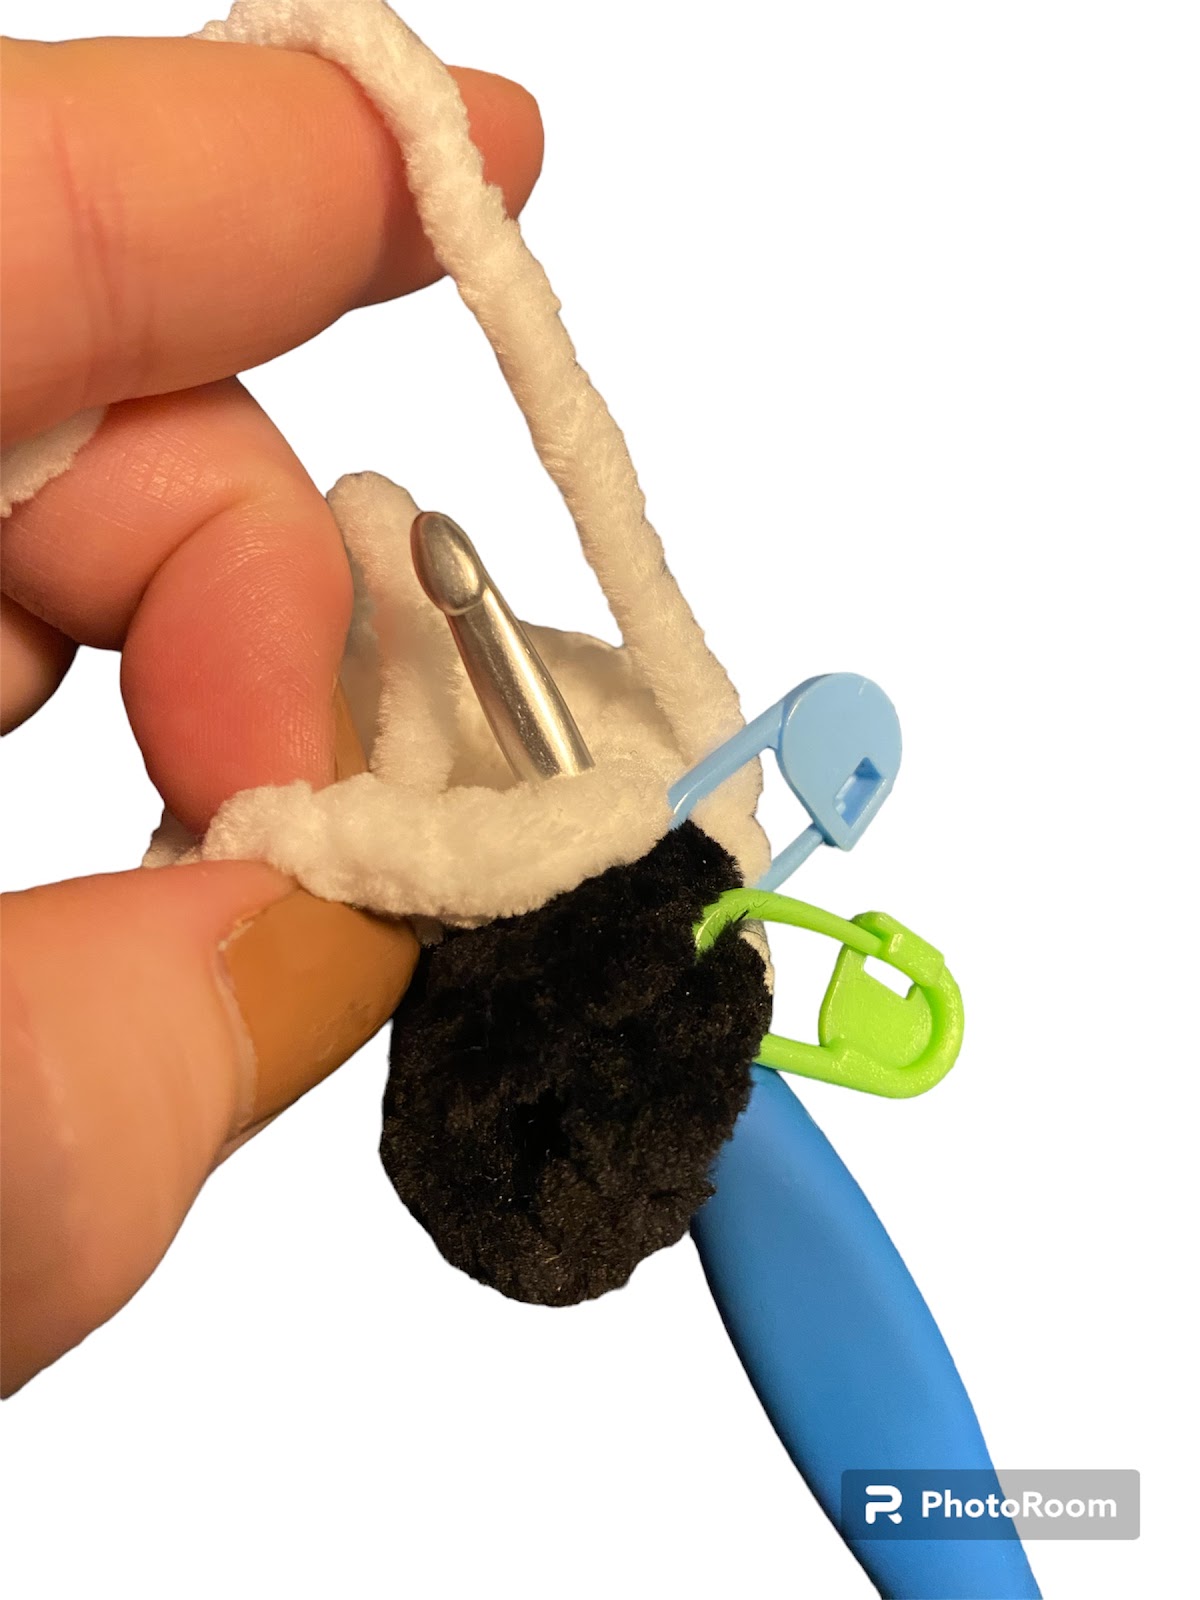
Round 1: 2hdc in 2nd ch from hook, sc in the next 3 chs, 5hdc in last ch (mark 3rd hdc with stitch marker), turn (rotate) and begin working the other side of the ch, sc in the next 3 chs, 3hdc in the last ch (mark the last hdc with stitch marker), join with ss to the first hdc (16)
End off, weave in ends.
Lil’ Loops Snowman Body/Head: The body and head are worked in one piece from the bottom up in continuous rounds with the legs and arms crocheted in as you go.
- Attaching Legs: https://youtu.be/T8wZLPuYrNs?si=Smss8UBM2loHG2JR&t=827
- Attaching Arms: https://youtu.be/T8wZLPuYrNs?si=Smss8UBM2loHG2JR&t=1488
Using White, create a Magic Ring
Round 1: 6sc in the ring (6)
Round 2: *2sc* 6 times (12)
Round 3: *sc in the next st, 2sc* 6 times (18)
Round 4:
| Sc in the next st, Fold the first leg (Black) in half so that the 2 stitches (marked by stitch markers) are lined up. Hold the leg in front of your work. Working through the leg (2 marked stitches) and the next unworked st of the body, 2sc Working through the body only, Sc in the next 5 sts, Fold the second leg (Black) in half so that the 2 stitches (marked by stitch markers) are lined up. Hold the leg in front of your work. Working through the leg (2 marked stitches) and the next unworked st of the body, 2sc Working through the body only, Sc in the next 10 sts (20). | |
  |
Round 5: sc, scdec, sc in the next 5 sts, scdec, sc in the last 10sts (18)
Rounds 6-8: sc in each st (18)
Round 9: *sc in the next 4 sts, scdec* 3 times (15)
Round 10: *sc in the next 3 sts, scdec* 3 times (12),
Round 11:
| Place the character down on a hard surface with the body face ‘up’ and the legs facing you. Locate the 5 centre front sts and mark them with a stitch marker (the arms will be placed on either side of these sts). Locate the far right marked st. Count over 1 st to the right to begin Round 11. (If this is not the next unworked st then sc until you reach the indicated st.) (If left handed you will locate the left st and count over 1 st to the left). Fold the first arm (White) in half so that the 2 stitches (marked by stitch markers) are lined up. Hold the arm in front of your work. Working through the arm (2 marked stitches) and the next unworked st of the body, 2sc Working through the body only, Sc in the next 5 sts, Fold the second arm (White) in half so that the 2 stitches (marked by stitch markers) are lined up. Hold the arm in front of your work. Working through the arm (2 marked stitches) and the next unworked st of the body, 2sc Working through the body only, Sc in the next 5 sts (14). | 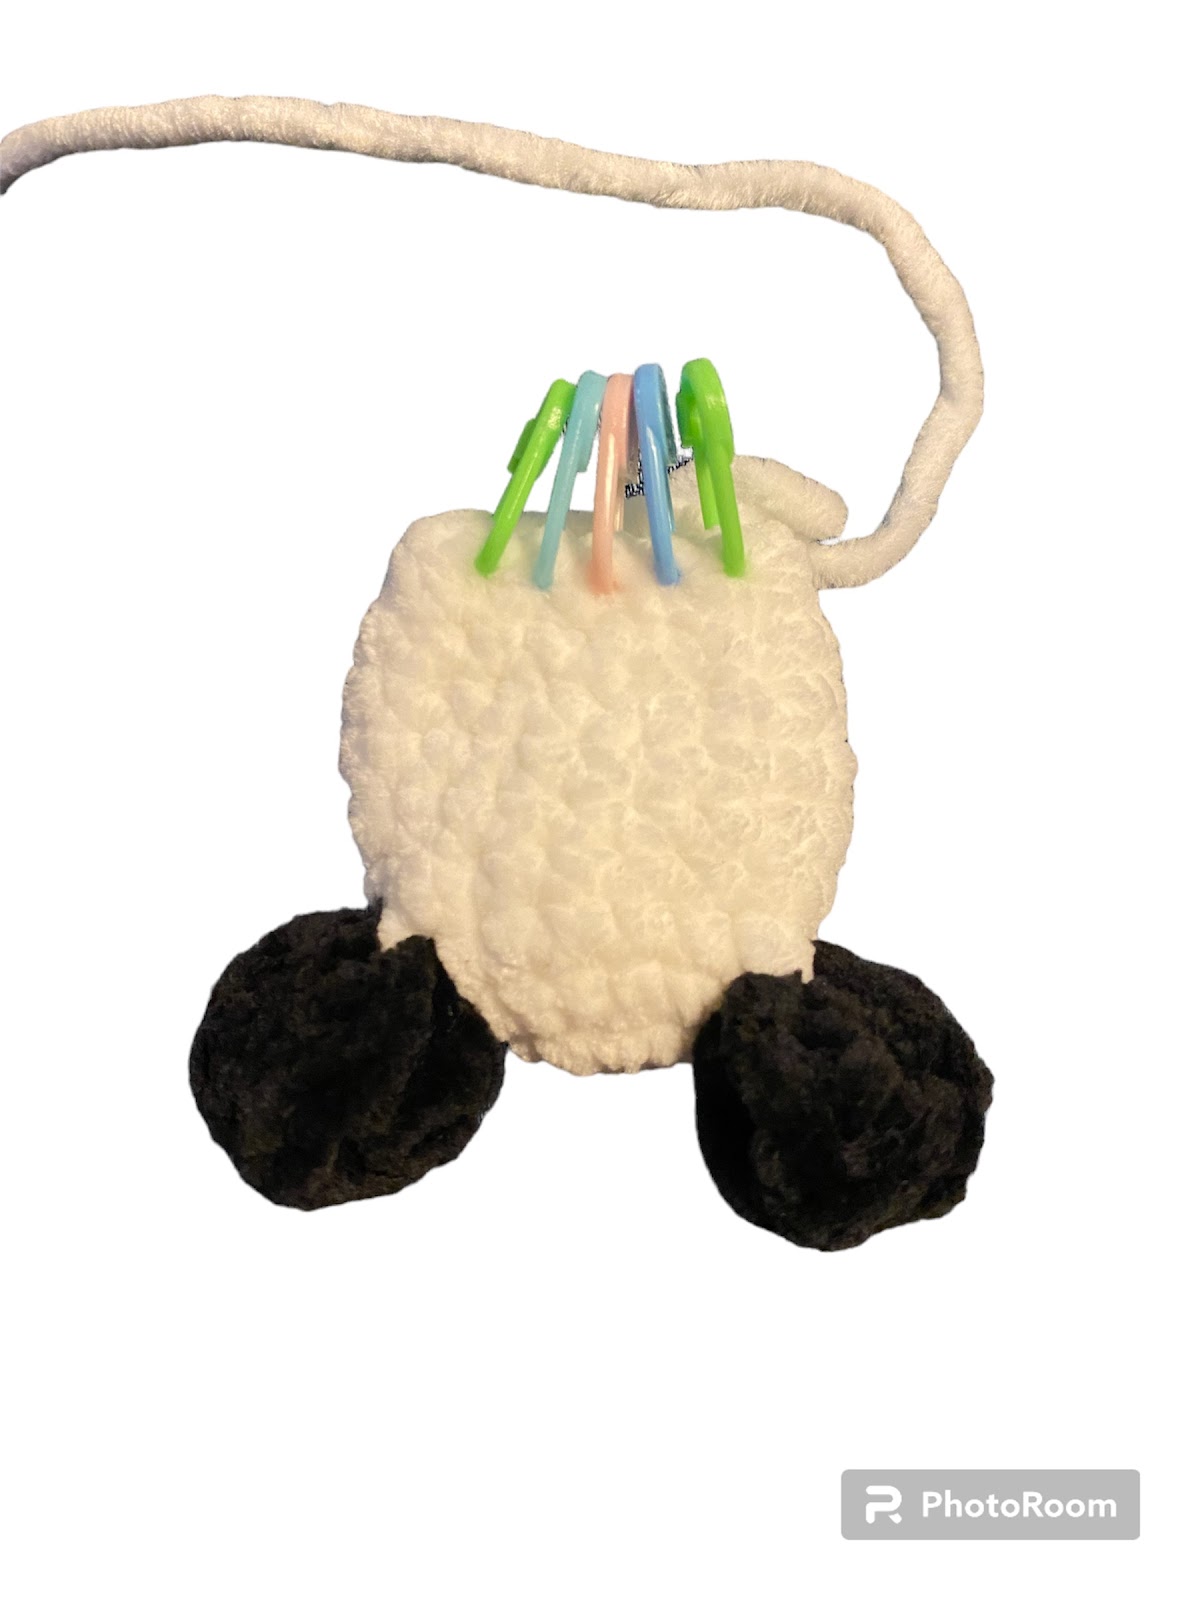 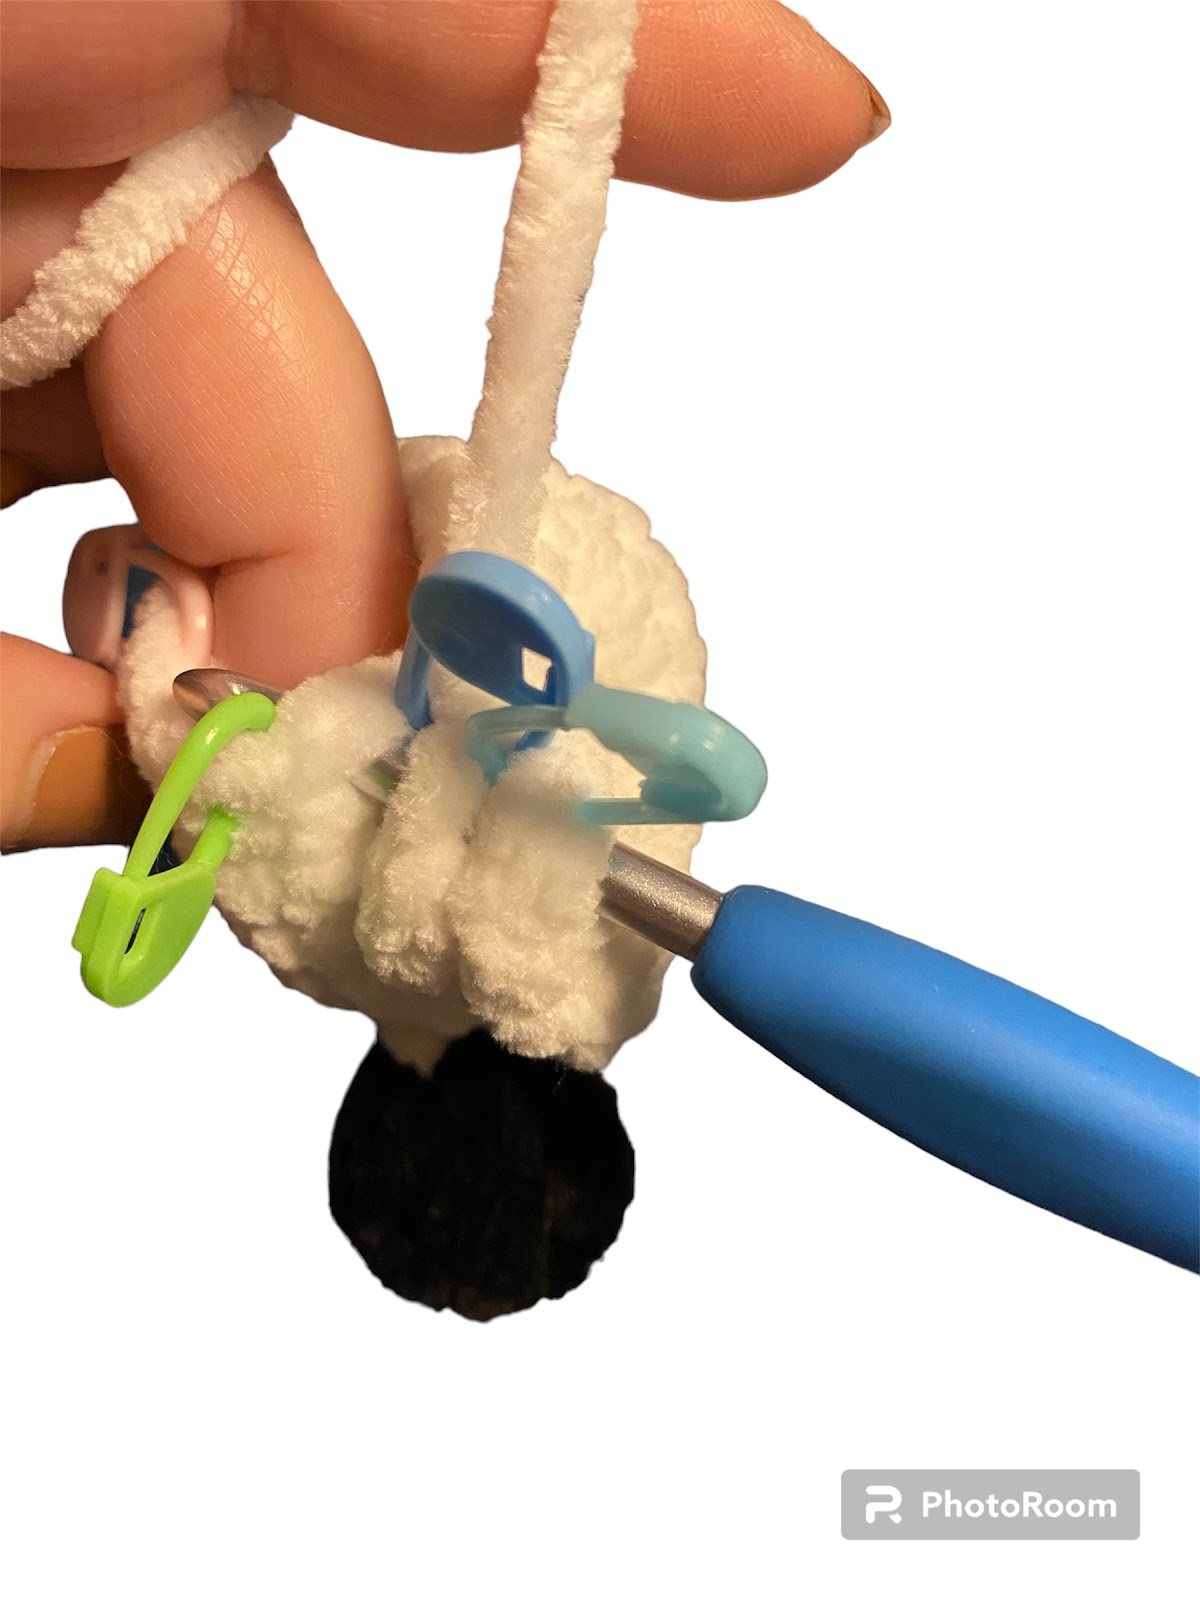 |
Begin stuffing lightly.
Round 12: sc in the next 2 sts, *2sc* 5 times, sc in the next 2 sts, *2sc* 5 times (24)
Rounds 13-16: sc in each st (24)
Round 17: *sc in the next 6 sts, scdec* 3 times (21)
Round 18: *sc in the next 5 sts, scdec* 3 times (18)
Add safety eyes to Round 16 on the front of the head approximately 4 sts apart (3sts showing between the eyes), continue stuffing lightly.
Round 19: *sc in the next 4 sts, scdec* 3 times (15)
Round 20: *sc in the next 3 sts, scdec* 3 times (12)
Round 21: *scdec* 6 times (6)
Finish stuffing
End off leaving a 6” tail, cinch the last 6 sts together and weave in the end.
Lil’ Loops Snowman Hat: The hat is worked in continuous rounds from the top down.
Using Black, create a Magic Ring
Round 1: 8sc in the Ring (8)
Round 2: *2sc* 8 times (16)
Round 3: sc in each stitch (16)
Round 4: *sc in the next 2 sts, scdec* 4 times (12)
Round 5: sc in each st (12)
Round 6: *2sc* 12 times (24)
End off by ss to the next stitch, leaving a 12” tail for sewing.
Lil’ Loops Snowman Bow: Made in a joined chain.
Using Green, ch 6
Join to the first ch creating a loop. End off, leaving a 9” tail. Flatten the loop and wrap the tail around the centre to create the centre of the bow
Lil’ Loops Snowman Scarf: Created in 1 Row
Using Bordeaux, ch 31
Row 1: sc in the 2nd ch from the hook, sc in the next 29 sts (30)
End off, weave in ends.
How to assemble your Lil’ Loops Snowman Free Crochet Pattern
Sewing Placement – I highly recommend pinning ALL parts of your Lil’ Loops Snowman in place BEFORE sewing to make sure everything sits properly and is to your liking 🙂
| Hat: Place the hat on top of the head, tilted to one side. Stuff lightly if desired, Sew in place. |
| Bow: Place on hat and sew down. |
| Nose: Using approx 18” of Gold Dust thread the needle. Working in between the eyes. Insert your needle on an angle 2 rounds down from the inner portion of the left eye and out near the bottom inner corner of the right eye . Repeat through the same set of holes 6-8 times. |
| Eyes: If needed, embroider on sleepy eyes. See video: Sleepy Eyes – https://youtu.be/4kO0XAkXMGo |
| Scarf: Place and tie in place around the neck. |
Congratulations!
You have now completed your Lil’ Loops Snowman Free Crochet Pattern!
Easy Crochet Snowman Pattern for Beginners
There are several reasons why this easy amigurumi snowman pattern would make a great first project for those beginners, that are new to their crochet hobby!
No Sewing Required
- This pattern is designed to minimize sewing, making it ideal for beginners who may find sewing tricky.
- A low-sew amigurumi pattern that’s also a small size, means it’s faster to complete. Which means you can finish it quickly.
Clear and Concise Instructions: The free snowman crochet pattern provides clear and concise instructions, with helpful tips and tricks for beginners. Plus, a step-by-step, full video tutorial for you to follow along with!
Remember, every crocheter, no matter how experienced, started somewhere. I really hope you feel encouraged to give this free crochet pattern a try.
We love seeing your finished projects. Tag us in your photos and posts using #DarlingMapleDesigns or @DarlingMapledesigns.
Ready to add a little snow fun to your holiday decor? This Lil’ Loops Snowman crochet pattern is the perfect project! With its simple design and cute features, it’s easy to see why everyone’s falling in love with this little guy.
Even if you’re just starting out, this Lil’ Loops Snowman pattern is the perfect way to practice your skills and create an adorable amigurumi to build your confidence!
Thank you so much for joining us! I hope you loved completing your Lil’ Loops Snowman as much as I enjoyed designing it. Don’t want to miss a stitch? Subscribe to the Darling Maple Designs newsletter and I’ll send updates for new pattern releases, sales and promotions straight to your inbox. See you again soon! Sara <3
If you have any questions or concerns with this, or any other pattern written by Darling Maple Designs, please do not hesitate to contact me at: info@darlingmapledesigns.com.
Don’t forget to Pin it to your project board.


These are so cute!