Learn to crochet these quick, cute and no sew Mini Valentine Gnomes with this step-by-step amigurumi crochet pattern and FREE Video Tutorial!
This adorable little Gnome amigurumi is perfect for craft markets, gifts, decor and more! Crochet for anyone on your gift list. Add a lollipop through the hands to use as Valentines and small classroom gifts. The possibilities are endless.
How to Crochet the Low-sew Mini Valentine Gnome Pattern
The Mini Valentine Gnome is shown using Hobbii Honey Bunny (similar to Premier Parfait Chunky), (light super bulky (6)).
Feel free to experiment with your favourite Amigurumi yarns as well! Check out this using scrap yarn post for some guidelines on how.
This free amigurumi gnome pattern works up quickly and easily with only a tiny bit of optional sewing required and very little embroidery. The body/head are worked in one piece with features like the nose and hat crocheted in as you go.
The Mini Valentine Gnomes pattern also includes a full video tutorial!
Don’t forget to check out the Mini Valentine Gnome premium PDF! The Mini Valentine Gnomes includes 3 variations in this inexpensive ad-free PDF on Ravelry or Etsy!
Grab the Mini Valentine Gnomes pattern…

Adorable Cute Gnome Amigurumi for Valentine’s Day Gifting
These mini Valentine gnome amigurumi are the perfect embodiment of “big love in a small package.” Their tiny size makes them irresistibly cute and incredibly versatile. Imagine finding one nestled in a pocket, clipped to a keychain, or peeking out from a Valentine’s Day card—a delightful surprise for anyone!
These cute Valentine gnomes are ideal gifts for anyone you want to show you care about. Children will adore their little size, making them great for classmates, friends, or siblings. For romantic partners, these mini gnomes offer a sweet and unique alternative to traditional Valentine’s Day gifts. They’re also perfect for friends, family members, or even coworkers—anyone who deserves a little extra love and appreciation.
Of course, because they’re handmade, they carry a special significance, demonstrating the time and effort you put into creating something unique and heartfelt. These little gnomes are more than just cute; they’re a tiny token of love and affection, perfectly sized to fit in the palm of your hand—and in the heart of the recipient. 💞
Want to stay up to date on all the Darling Maple Designs happenings? Be sure to subscribe to my newsletter ![]()
Thank you so much for being here and crocheting with me ![]() .
.
Please share your work by tagging me on FB or IG @darlingmapledesigns or use #darlingmapledesigns for a chance to have your work featured in my IG stories! ![]() Sara
Sara

Interested in more cute crochet patterns? Check these out!
What you will need to make your Low Sew Mini Valentine Gnomes Crochet Pattern
Easy To Follow, Process Photos And Free Video Tutorial Included!
Materials:
| Yarn – Shown in Hobbii Honey Bunny Yarn (6), similar to Parfait Chunky and Himalaya Dolphin Baby (Note: These yarns work up similar to most (5) weight yarns) | |||
| Yardage | Colours | ||
| Pink Hat | Purple Hat | Striped Hat | |
| 25 yards each | Candy Floss (Pink), Silver (Grey) | Honey Bunny Candy Lilac (Light Purple), Hint of Pink (Light Pink) | Anthracite (Dark Grey), Pink (Dark Pink) |
| small amount of each | Beige (Cream), White, Hint of Pink (Light Pink), Pink (Dark Pink), Anthracite (Dark Grey) | Beige (Cream), White, Pink (Dark Pink) | Hint of Pink (Light Pink), Candy Floss (Pink), Beige (Cream), White |
| Polyester filling | small amount | |
| Stitch Markers or Safety pins | ||
| Yarn needle to weave in the ends | ||
| Optional – River Rocks to weigh down body | ||
| Optional – Lollipop to place in hands | ||
| Gauge: 4 Rounds of Gauge Pattern | 2.0 inch diameter | |

Gauge Pattern:
Create a Magic Ring
Round 1: 6sc in the ring (6)
Round 2: 2sc in each st (12)
Round 3: *sc, 2sc* 6 times (18)
Round 4: *sc in the next 2 sts, 2sc* 6 times (24)
Abbreviations:
| BLO | back loop only |
| Bobble st | Bobble Stitch |
| ch | chain |
| dc | double crochet |
| FLO | front loop only |
| hdc | half double crochet |
| sc | single crochet |
| scdec | single crochet decrease |
| ss | slip stitch |
| st(s) | stich(es) |
| *to* | repeat the sequence between the ** the number of times indicated |
| YO | Yarn Over |
Special Stitches & Techniques:
Bobble Stitch – *YO, insert hook into indicated st, YO, pull up loop, YO, pull through 2 loops on hook* 3 times, YO, pull through all 4 loops on hook.
https://youtu.be/BJEKnNvGcp0?si=A-EfNc6q7OEvkqHL
Magic ring – https://youtu.be/ayek4XfmDvM
Attaching Nose – https://youtu.be/93bghFBjRUg?si=MDcg7pjFmJDfN_YP&t=1654
FULL VIDEO TUTORIAL: https://youtu.be/Zl2Xgl6gSrA?si=G97YXyJ8TNFttrxe
Notes:
- #sc, eg. (2sc, 3sc, etc) shows the number of scs to be completed in the indicated st
- Sts listed between brackets are all worked in the same st, eg. (hdc, dc)
- I highly recommend using a stitch marker to help keep track of the rounds for the body/head
Recommended Sequence for the Low Sew Mini Valentine Gnomes Free Crochet Pattern:
It is highly recommended to complete the Low Sew Mini Valentine Gnomes pattern in the order the pattern is written.
Start your Mini Valentine Gnome Crochet Pattern: Pink Hat
Valentine Gnomes Nose/Beard: The nose is worked in continuous rounds with the beard worked in the FLO of Round 4 of the nose.
Using Cream, create a Magic Ring
Round 1: 6sc in the ring (6)
Round 2: *2sc* 6 times (12)
Round 3: sc in each st (12)
Round 4: *scdec* 6 times (6), if making the beard change to White, if not making beard, end off, weave in ends.
Before beginning Round 5 mark the back loop of the next 3 sts with stitch markers (these will be used when crocheting the nose onto the body)
Note: In Round 5 the sts shown within the same brackets will be worked into the same stitch.
Round 5: Working in the FLO,
(ss in next st, ch4, beginning in 2nd ch from hook, ss in next 3 chs, ss, ch5, beginning in 2nd ch from hook, ss in next 4 chs),
(ss in next st, ch6, beginning in 2nd ch from hook, ss in the next 5 chs, ss, ch6, beginning in 2nd ch from hook, ss in the next 5 chs),
(ss in next st, ch5, beginning in 2nd ch from hook, ss in next 4 chs, ss, ch4, beginning in 2nd ch from hook, ss in next 3 chs, ss),
leave the last 3 sts unworked (6 strands of hair).
End off, weave in ends.
Valentine Gnomes Arms (make 2): The arm is worked in 1 row.
Using Cream, ch 7
Row 1: ss in the 4th ch from the hook, ss in the next 3 chs (4)
End off, leaving a 6” tail.
Valentine Gnomes Body/Head: The body and head are worked in one piece from the bottom up in continuous rounds with the nose/beard crocheted in as you go.
- Attaching Nose – https://youtu.be/Zl2Xgl6gSrA?si=Vs3XYBvHFdik7Eho&t=1620
Using Light Grey, create a Magic Ring
Round 1: 6sc in the ring (6)
Round 2: *2sc* 6 times (12)
Round 3: *sc in the next st, 2sc* 6 times (18)
Round 4: sc, change to Dark Grey, bobble st, change to Grey, sc in the next 5 sts, change to Dark Grey, bobble st, change to Grey, sc in the next 10 sts (18)
Rounds 5-8: sc in each st (18)
Place the gnome down on a hard surface with the body face ‘up’ and the legs facing you. Locate the centre front st and mark it with a stitch marker (the arms will be placed based on this centre st). Count over 4 sts to the left of the stitch marker and add a stitch marker to the front of this stitch. Count over 4 sts to the right of the Centre stitch marker and add a stitch marker to the front of the stitch. The marked sts are where the arms will be added
If a marked stitch is not the next unworked st of the body then sc until you reach the indicated st. The first stitch of Round 9 should be worked into the marked st on the right hand side (left if left handed). This will line up the nose/beard.
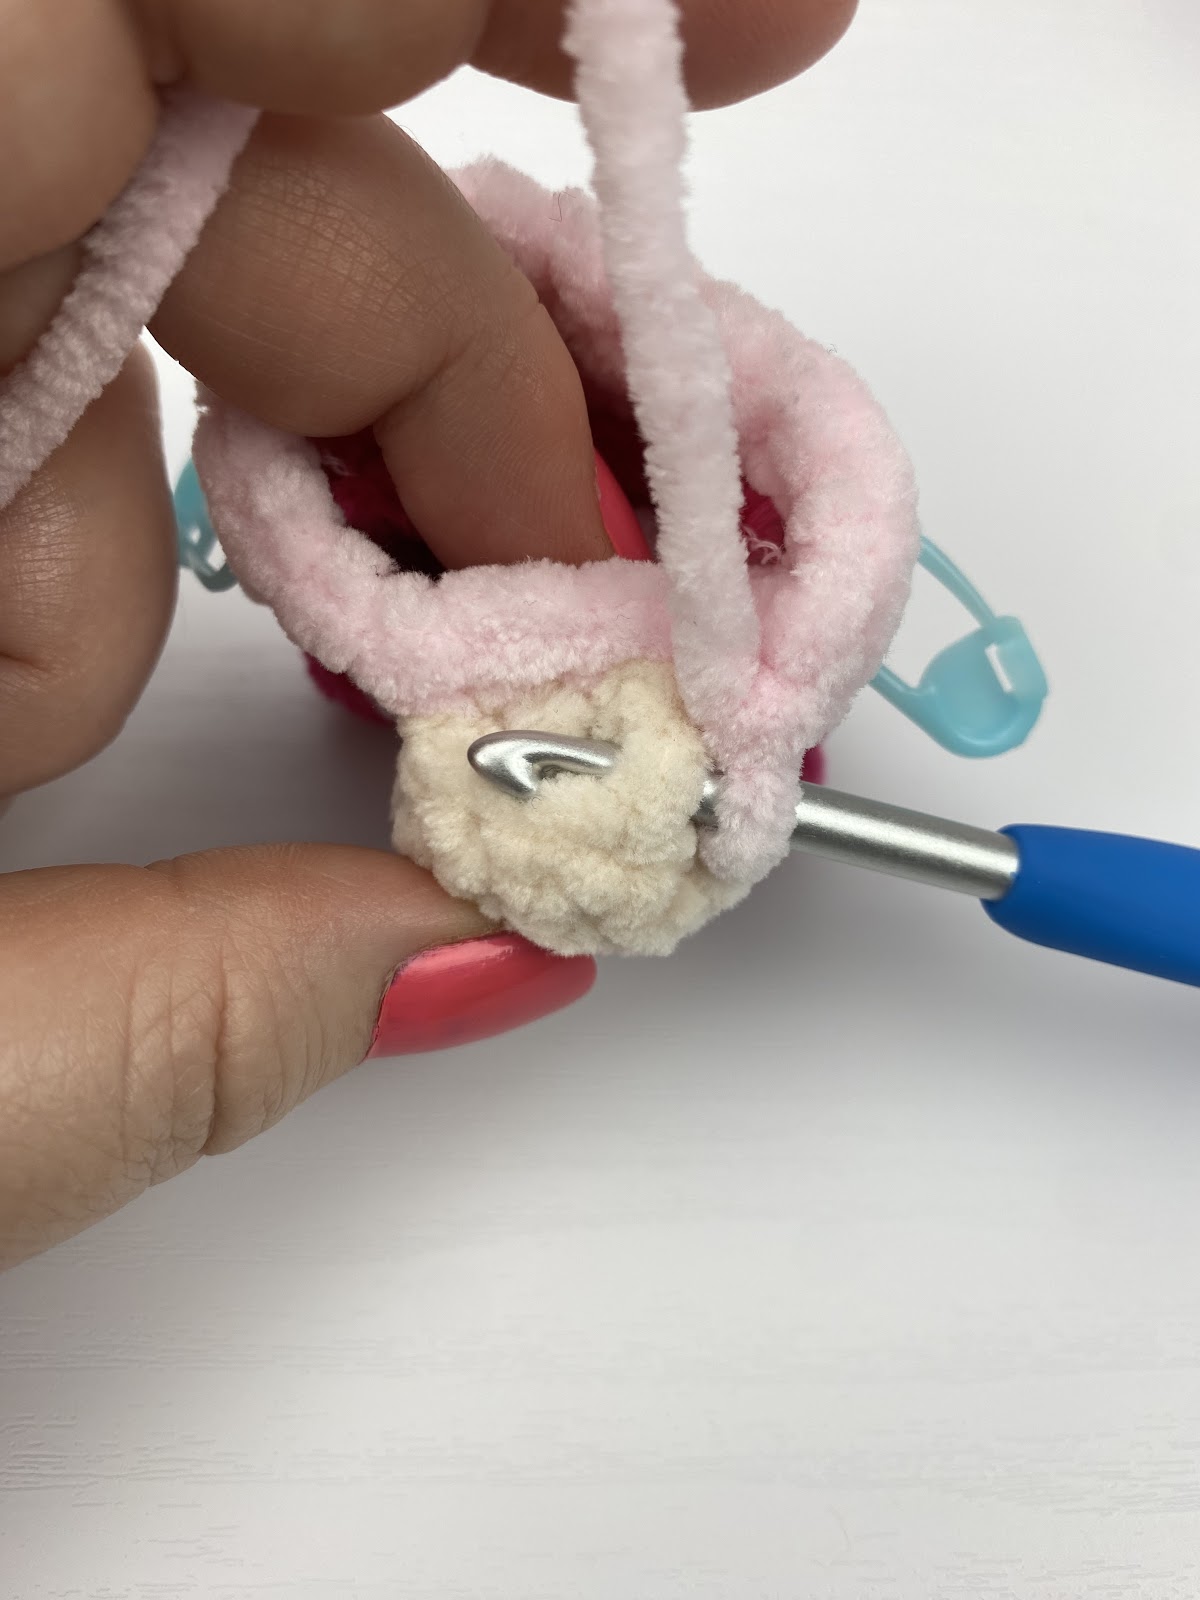
| Round 9: Sc in the next 3 sts, hold your nose in front of your work, with the marked sts (back loops) sitting beside the next 3 sts of the body. Beginning in the ‘back st’ closest to the right (left if left handed), working through both the Nose (inserting the hook from the inside of the st to the outside) and Body (outside to inside), sc in the next 3 sts, working through the body only, sc in the next 12 sts (18). | |
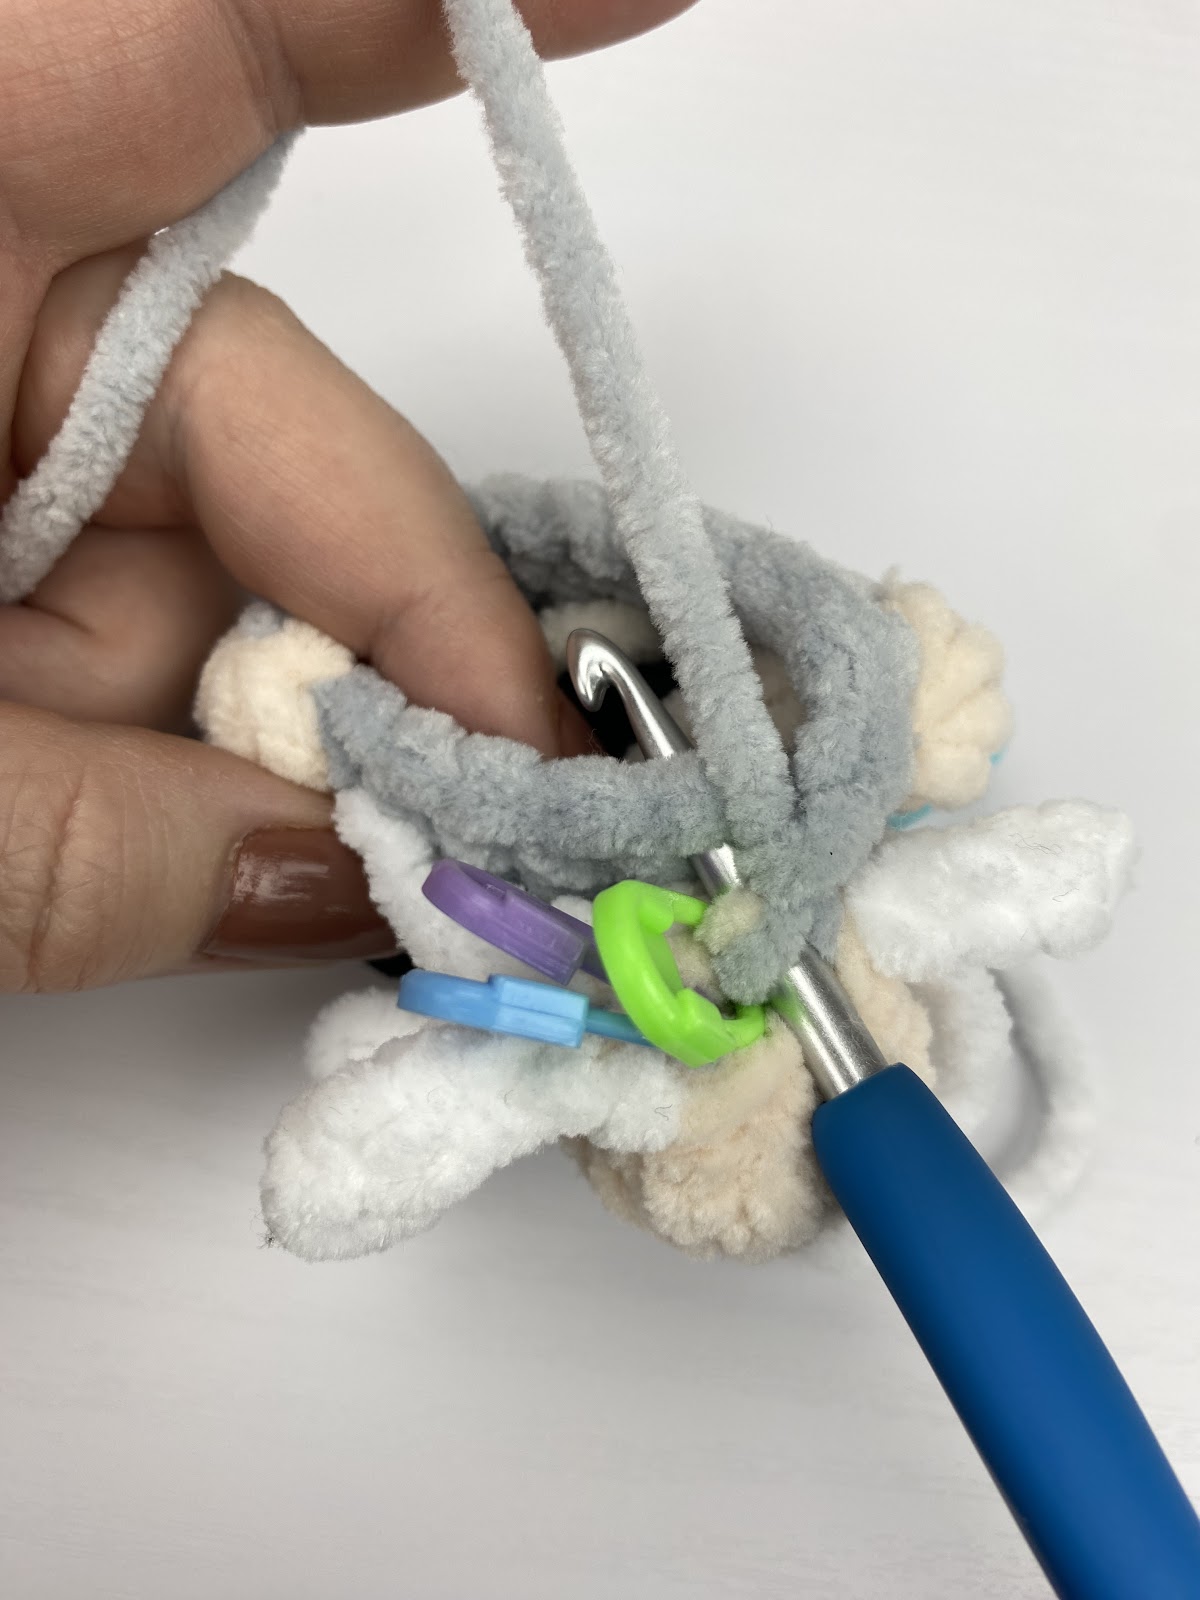 |
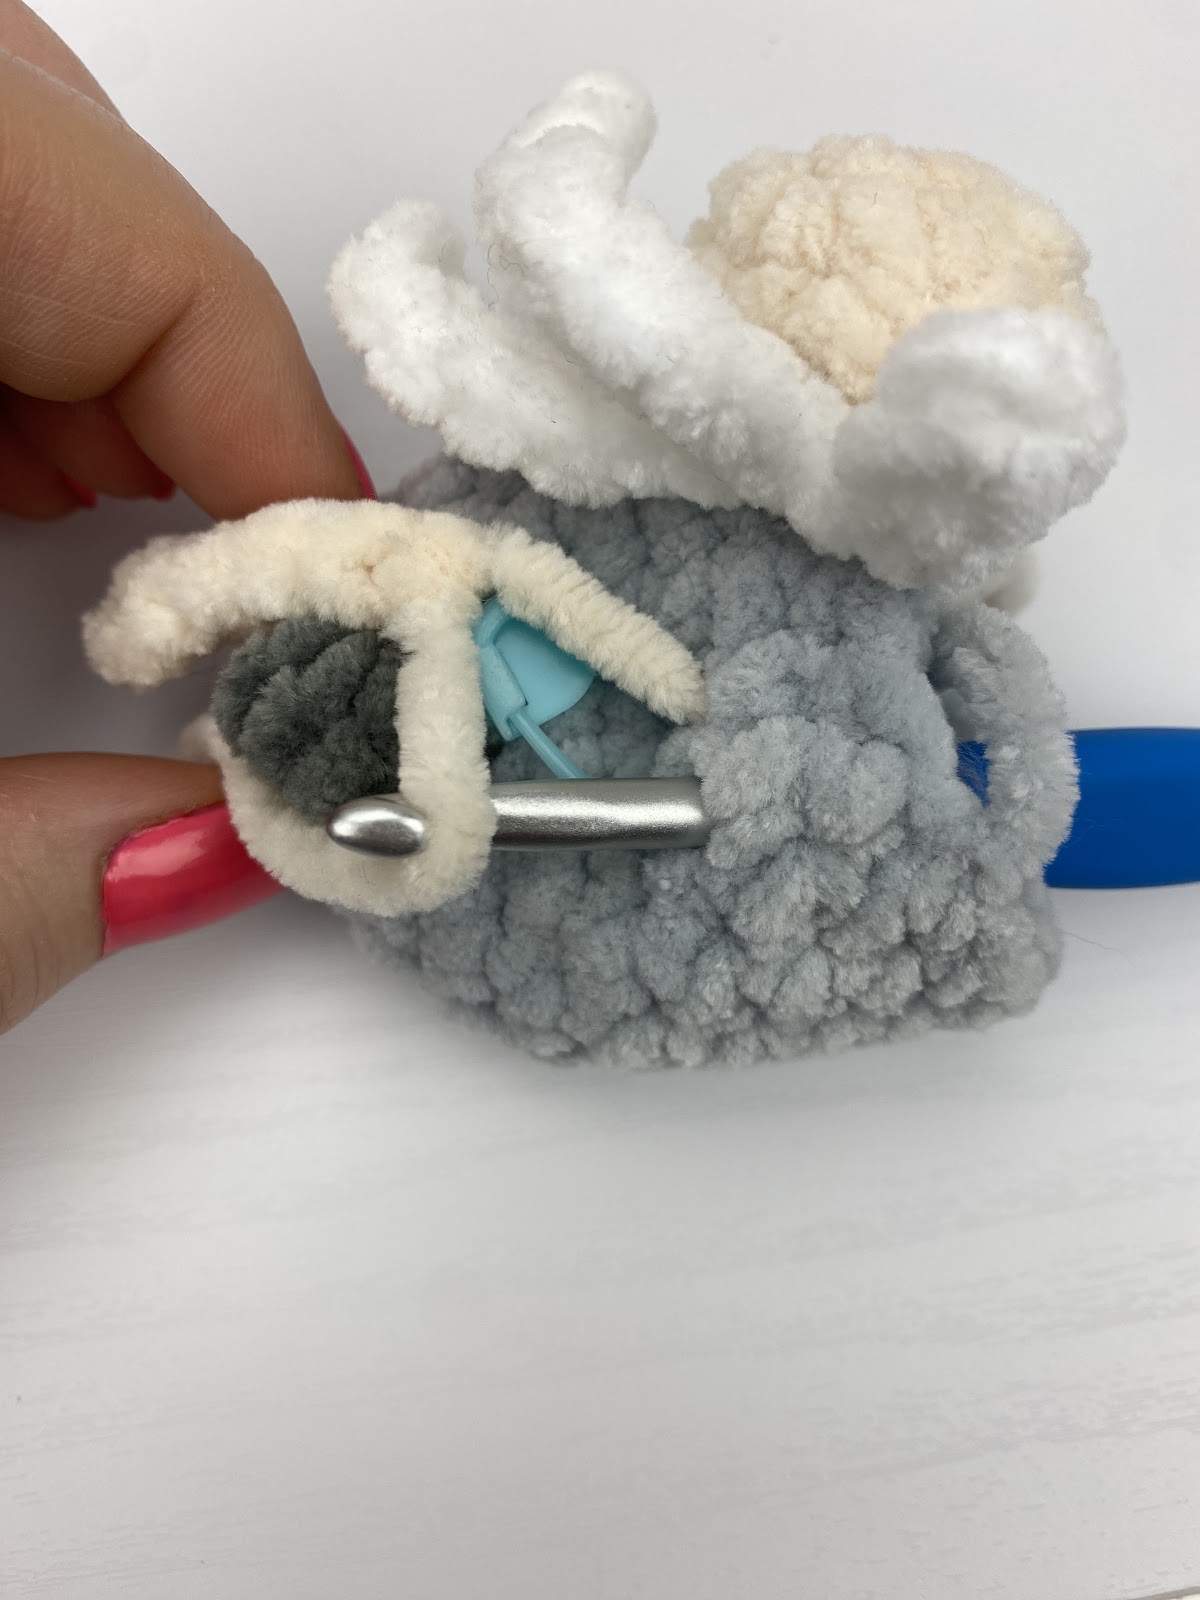
| Round 10: Sc in the next 3 sts, Working through the ‘top sts’ of the nose, sc in the next 3 sts (skip the 3 sts connecting the back of the nose to the body), working through the body only, sc in the next 12 sts (18). End off by ss to next st. Using the leftover tails of yarn from the nose, sew up the little holes created from crocheting the piece on. |
 |
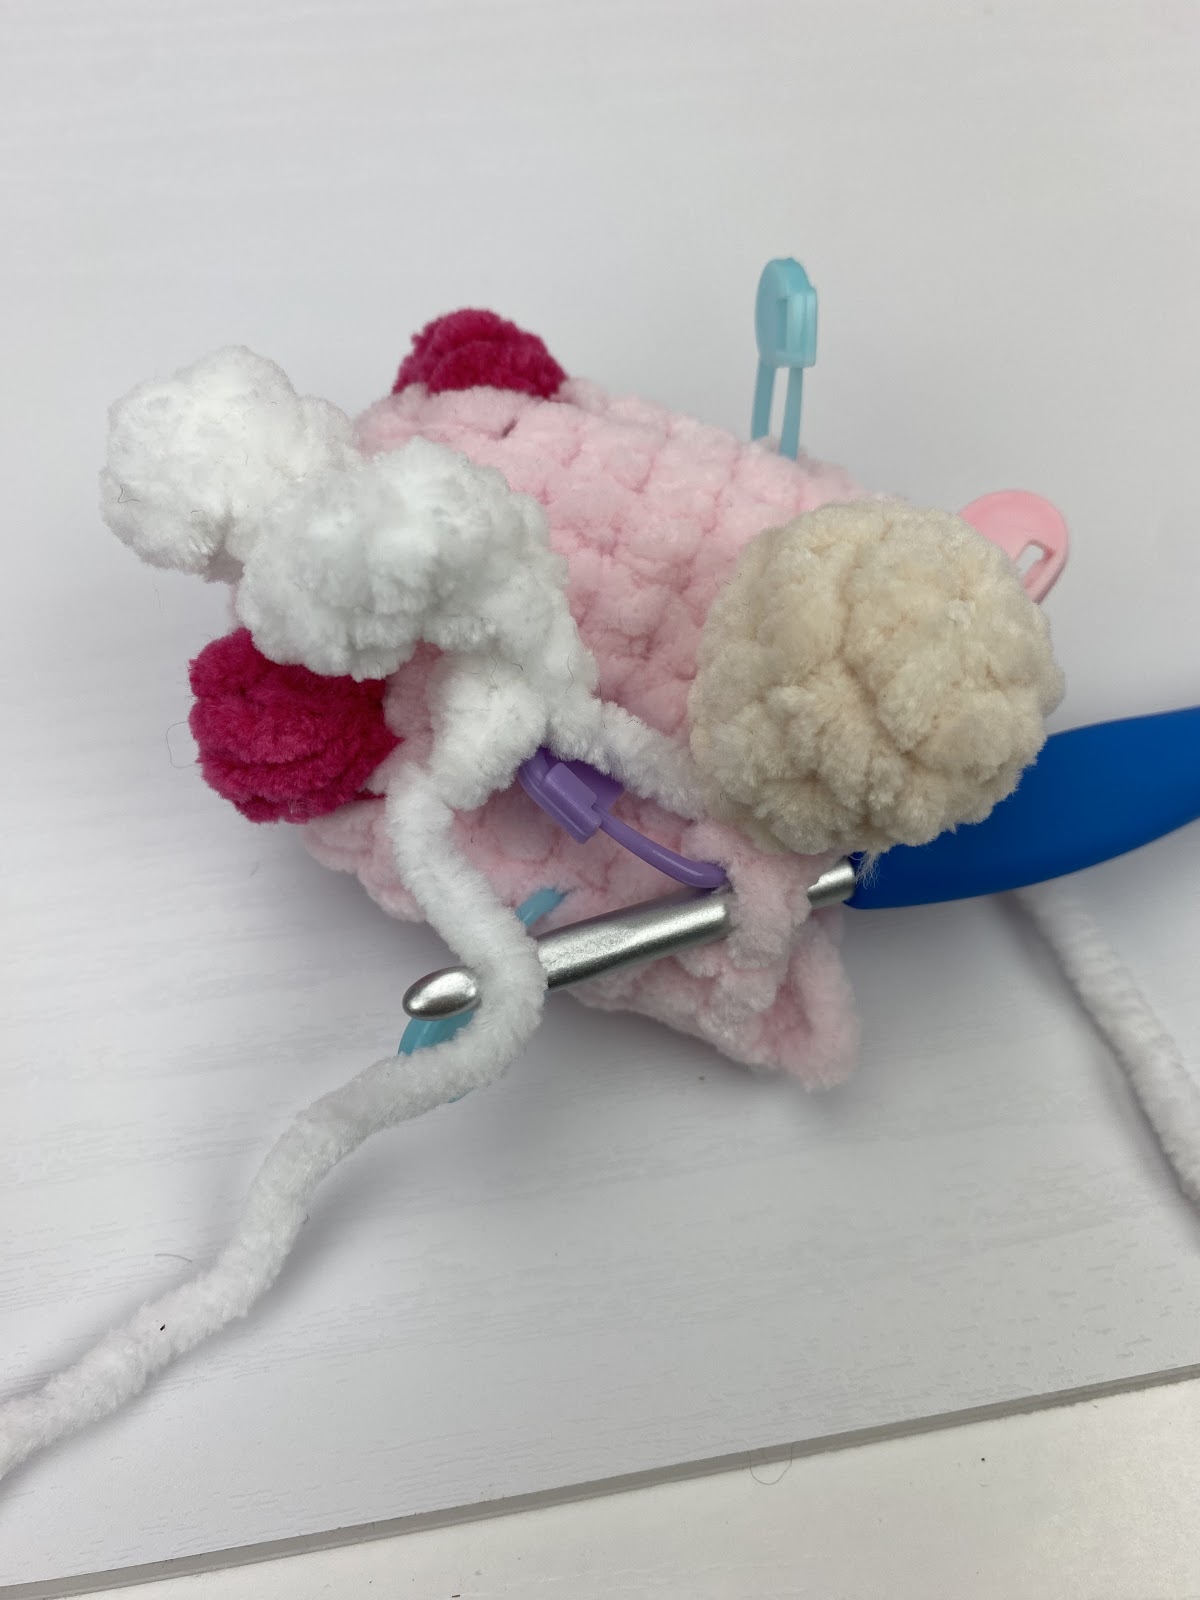
Pull the tails of the arms through on either side of each of the marked sts from Round 8 of the body. Tie off inside the body and continue to making the hat.
Valentine Gnomes Hat: The hat is worked in continuous rounds beginning from the bottom up and crocheted into the body at Round 6.
Using Pink, ch 24, join to first ch to create a loop (24)
Round 1: sc in each ch (24)
Round 2: sc in each st (24)
Round 3: *sc in the next 6 sts, scdec* 3 times (21)
Round 4: sc in each st (21)
Round 5: *sc in the next 5 sts, scdec* 3 times (18)
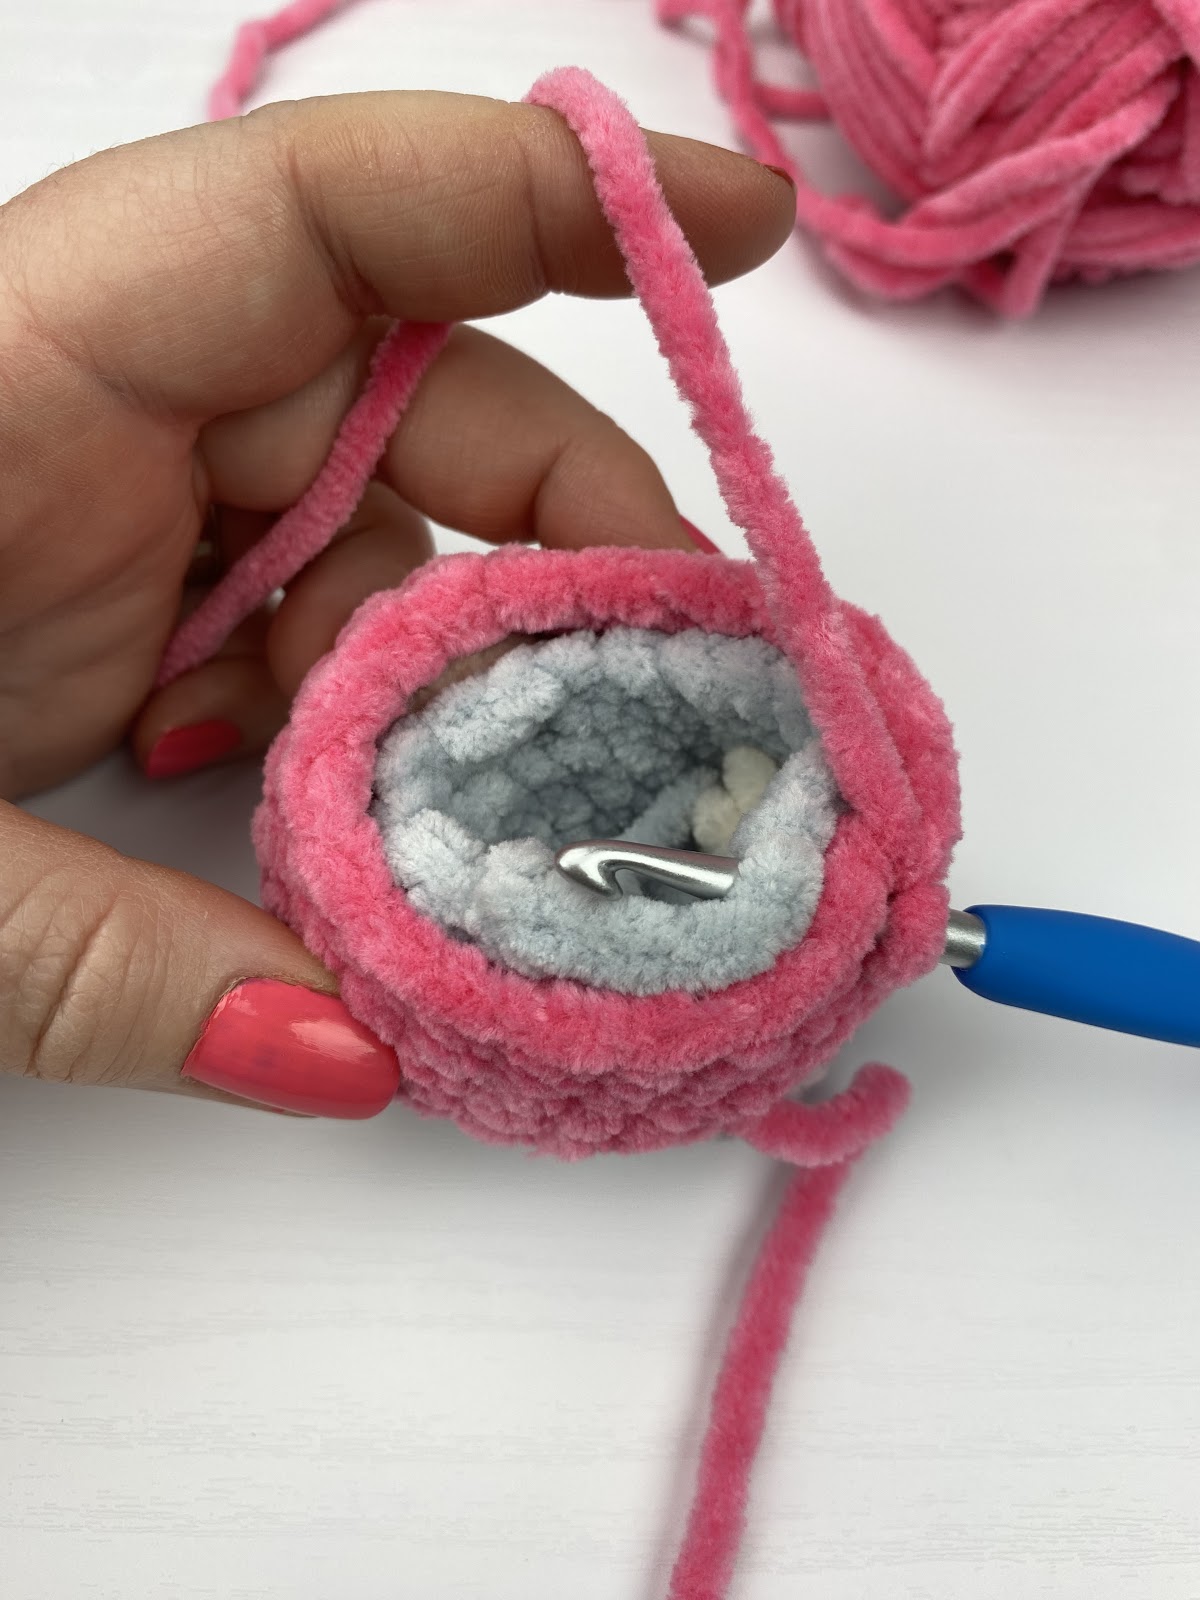
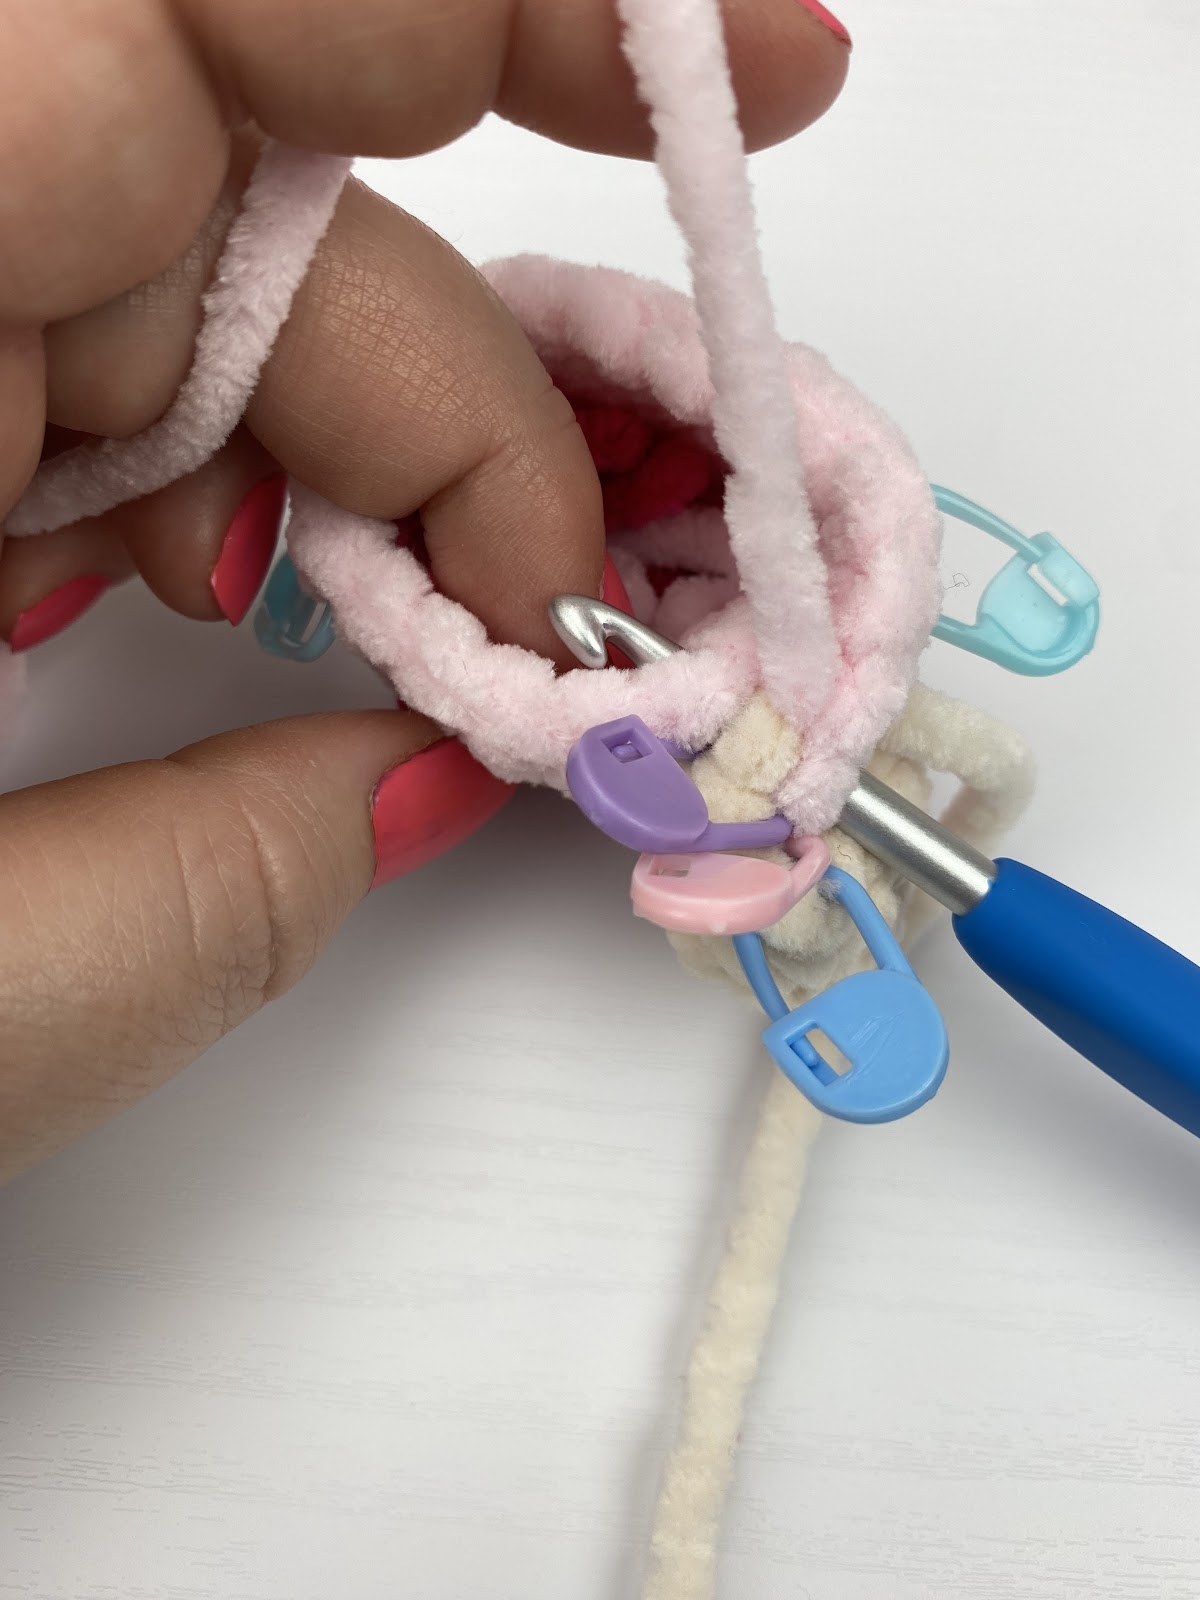
Round 6: Place the hat overtop of the body and line up the sts of Round 10 of the Body/Head and Round 5 of the Hat. Working through both pieces for the entire round, sc in each st (18)
Rounds 7-8: sc in each st (18), begin stuffing (add a few river rocks to the bottom if desired to weigh it down.)
Round 9: *sc in the next 4 sts, scdec* 3 times (15)
Round 10: sc in each st (15)
Round 11: *sc in the next 3 sts, scdec* 3 times (12)
Round 12: sc in each st (12)
Round 13: *sc in the next 2 sts, scdec* 3 times (9)
Finish stuffing
Round 14: *sc, scdec* 3 times (6)
Round 15: *sc, scdec* twice (4)
End off leaving a 6” tail, cinch the last 4 sts together and weave in the end.
Valentine Gnomes Heart (make 2): Made in 1 Round See small heart Tutorial: https://youtu.be/3jigkNrZFbk
Using Light or Dark Pink, ch 3
Round 1: Working all sts into the 3rd ch from the hook, 3dc, hdc, ch2, hdc, 3dc, ch2, ss, (8)
End off, leaving a 6” tail for sewing. Using a needle, sew the centre of the heart onto the hat as desired.
Valentine Gnomes Lollipop: Add a lollipop to the Gnome if desired by first pushing through the hat (at approx. Round 2-3, between the nose and arm), then push through the arm closest to the lollipop and then the arm further away.
Mini Valentine Gnomes Crochet Pattern: Purple Hat
Valentine Gnomes Nose: The nose is worked in continuous rounds.
Using Cream, create a Magic Ring
Round 1: 6sc in the ring (6)
Round 2: *2sc* 6 times (12)
Round 3: sc in each st (12)
Round 4: *scdec* 6 times (6)
End off, weave in ends. Place st markers in the last 3 worked sts of Round 4 to assist with crocheting the nose into the body.
Valentine Gnomes Hair (make 2): The hair is worked in 1 row.
Using White, ch 9
Row 1: 2sc in the 2nd ch from the hook, *2sc* in the next 7 chs (16)
End off leaving both ends for attaching hair.
Valentine Gnomes Arms (make 2): The arm is worked in 1 row.
Using Cream, ch 7
Row 1: ss in the 4th ch from the hook, ss in the next 3 chs (4)
End off, leaving a 6” tail.
Body/Head: The body and head are worked in one piece from the bottom up in continuous rounds with the nose/beard crocheted in as you go.
- Attaching Nose – https://youtu.be/Zl2Xgl6gSrA?si=Vs3XYBvHFdik7Eho&t=1620
Using Light Pink, create a Magic Ring
Round 1: 6sc in the ring (6)
Round 2: *2sc* 6 times (12)
Round 3: *sc in the next st, 2sc* 6 times (18)
Round 4: sc, change to Dark Pink, bobble st, change to Light Pink, sc in the next 5 sts, change to Dark Pink, bobble st, change to Light Pink, sc in the next 10 sts (18)
Rounds 5-8: sc in each st (18)
Place the gnome down on a hard surface with the body face ‘up’ and the legs facing you. Locate the centre front st and mark it with a stitch marker (the arms will be placed based on this centre st). Count over 4 sts to the left of the stitch marker and add a stitch marker to the front of this stitch. Count over 4 sts to the right of the Centre stitch marker and add a stitch marker to the front of the stitch. The marked sts are where the arms will be added
If a marked stitch is not the next unworked st of the body then sc until you reach the indicated st. The first stitch of Round 9 should be worked into the marked st on the right hand side (left if left handed). This will line up the nose/beard.
| Round 9: Sc in the next 3 sts, hold your nose in front of your work, with the marked sts sitting beside the next 3 sts of the body. Beginning in the ‘back st’ closest to the right (left if left handed), working through both the Nose (inserting the hook from the inside of the st to the outside) and Body (outside to inside), sc in the next 3 sts, working through the body only, sc in the next 12 sts (18). | |
 |
| Round 10: Sc in the next 3 sts, Working through the ‘top sts’ of the nose, sc in the next 3 sts (skip the 3 sts connecting the back of the nose to the body), working through the body only, sc in the next 12 sts (18). End off by ss to next st. Using the leftover tails of yarn from the nose, sew up the little holes created from crocheting the piece on. | |
 | |
| Place a st marker on the 3rd and 7th st of Round 10 (each side of the nose) to indicate where to place the pieces of hair. Pull the tails for the hair through on either side of each of the marked sts from Round 10 of the body. Tie off inside the body. | |
 |
| Pull the tails of the arms through on either side of each of the marked sts from Round 8 of the body. Tie off inside the body and continue to making the hat. |
 |
Valentine Gnomes Hat: The hat is worked in continuous rounds beginning from the bottom up and crocheted into the body at Round 6.
Using Purple, ch 24, join to first ch to create a loop (24 chs)
Round 1: sc in each ch (24)
Round 2: sc in each st (24)
Round 3: *sc in the next 6 sts, scdec* 3 times (21)
Round 4: sc in each st (21)
Round 5: *sc in the next 5 sts, scdec* 3 times (18)
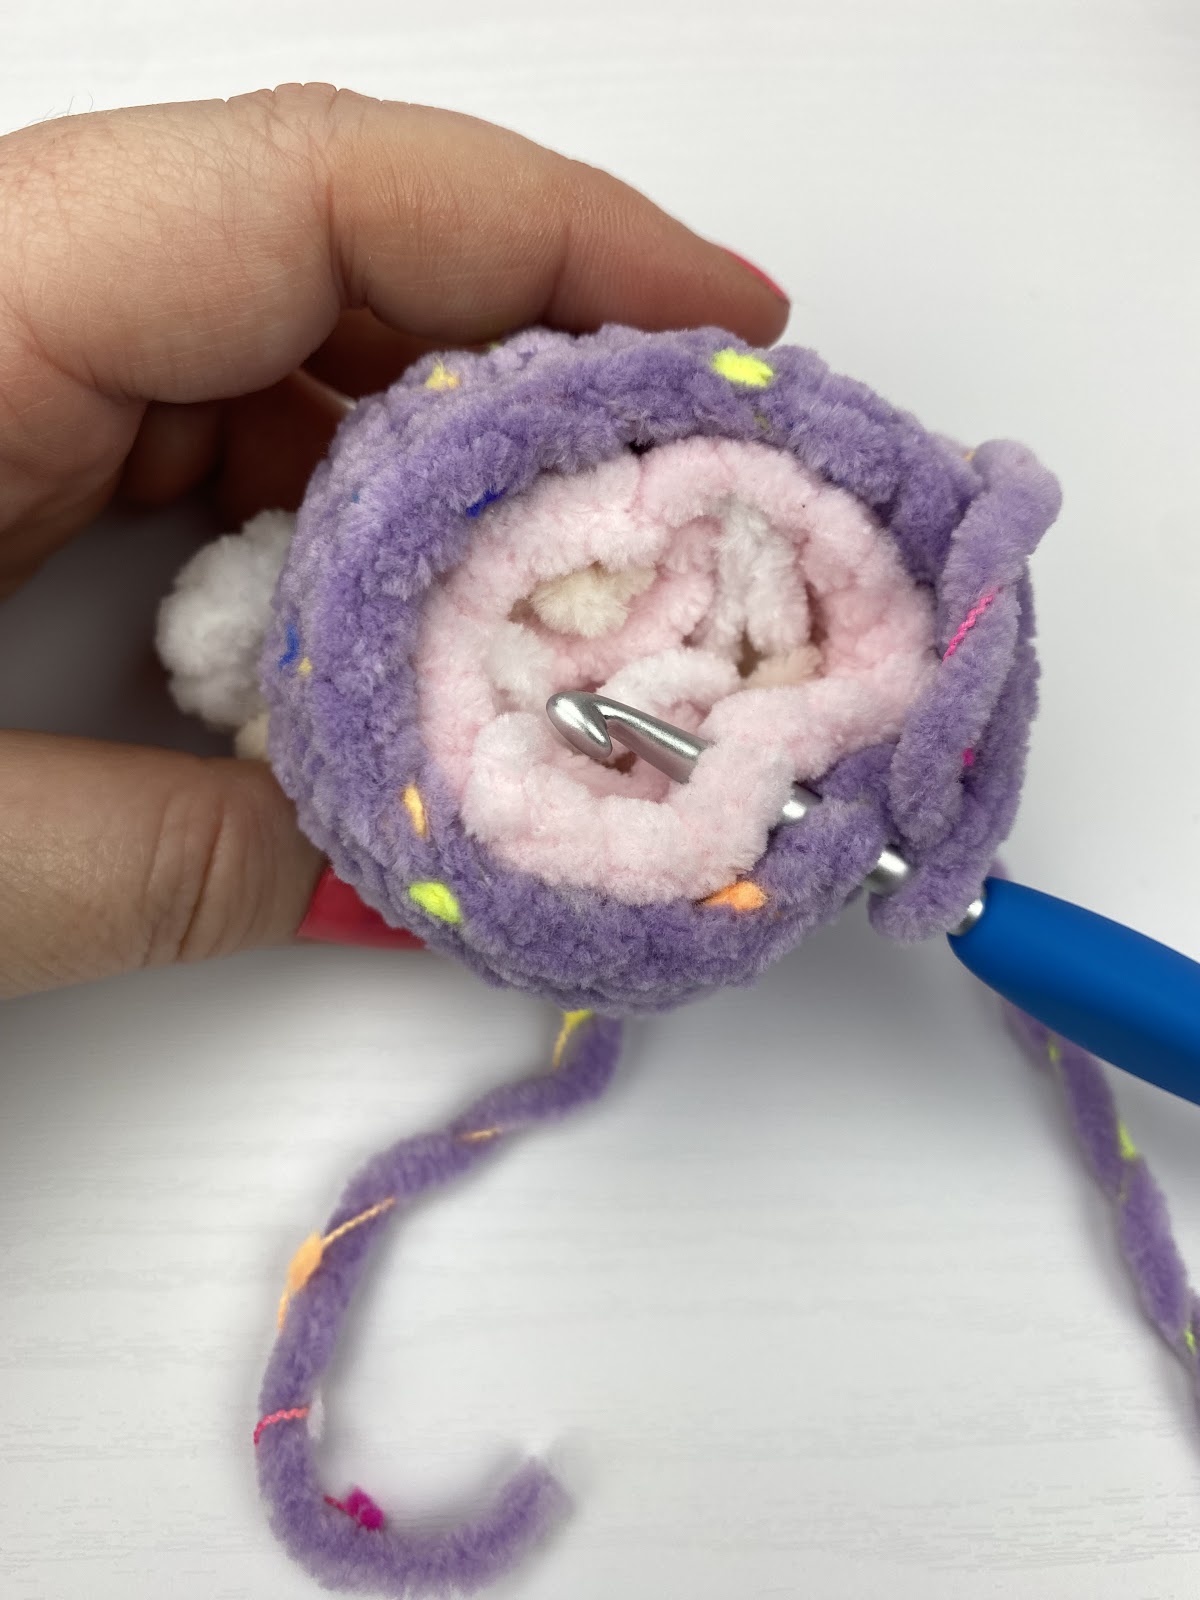
Round 6: Place the hat overtop of the body and line up the sts of Round 10 of the Body/Head and Round 5 of the Hat. Working through both pieces for the entire round, sc in each st (18)
Rounds 7-8: sc in each st (18), begin stuffing (add a few river rocks at the bottom if desired to weigh it down).
Round 9: *sc in the next 4 sts, scdec* 3 times (15)
Round 10: sc in each st (15)
Round 11: *sc in the next 3 sts, scdec* 3 times (12)
Round 12: sc in each st (12)
Round 13: *sc in the next 2 sts, scdec* 3 times (9)
Finish stuffing
Round 14: *sc, scdec* 3 times (6)
Round 15: *sc, scdec* twice (4)
End off leaving a 6” tail, cinch the last 4 sts together and weave in the end.
Sewing Placement –
| Embroidered Hearts (optional): Embroider Hearts as desired on the front of the hat. Using approx. 18 inches of yarn. Insert needle into where you’d like the bottom of the heart. Angle the needle up and to the left approx. 2sts/rounds. Repeat through the same set of holes 5 times. Repeat for the second side of the heart by using the same bottom point and angling your needle up and to the right approx. 2sts/rounds. Repeat through this set of holes 5 times. Tie off and weave in ends. 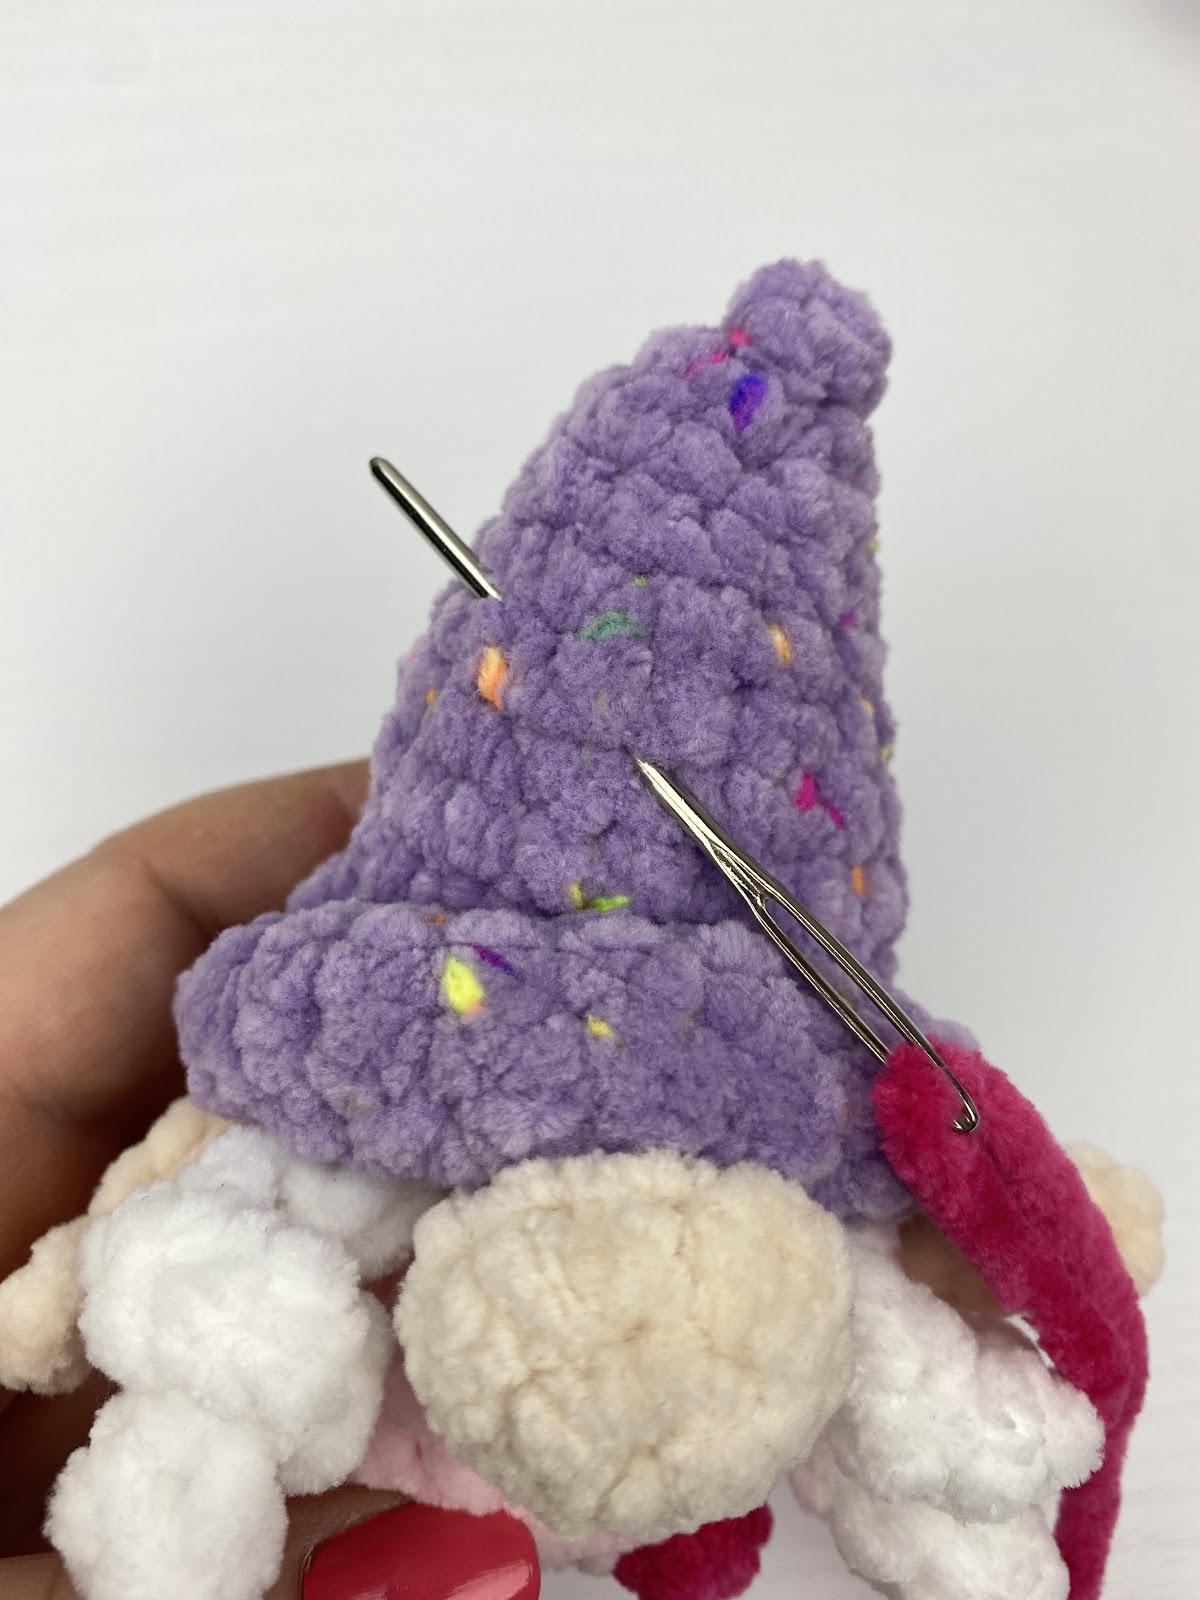  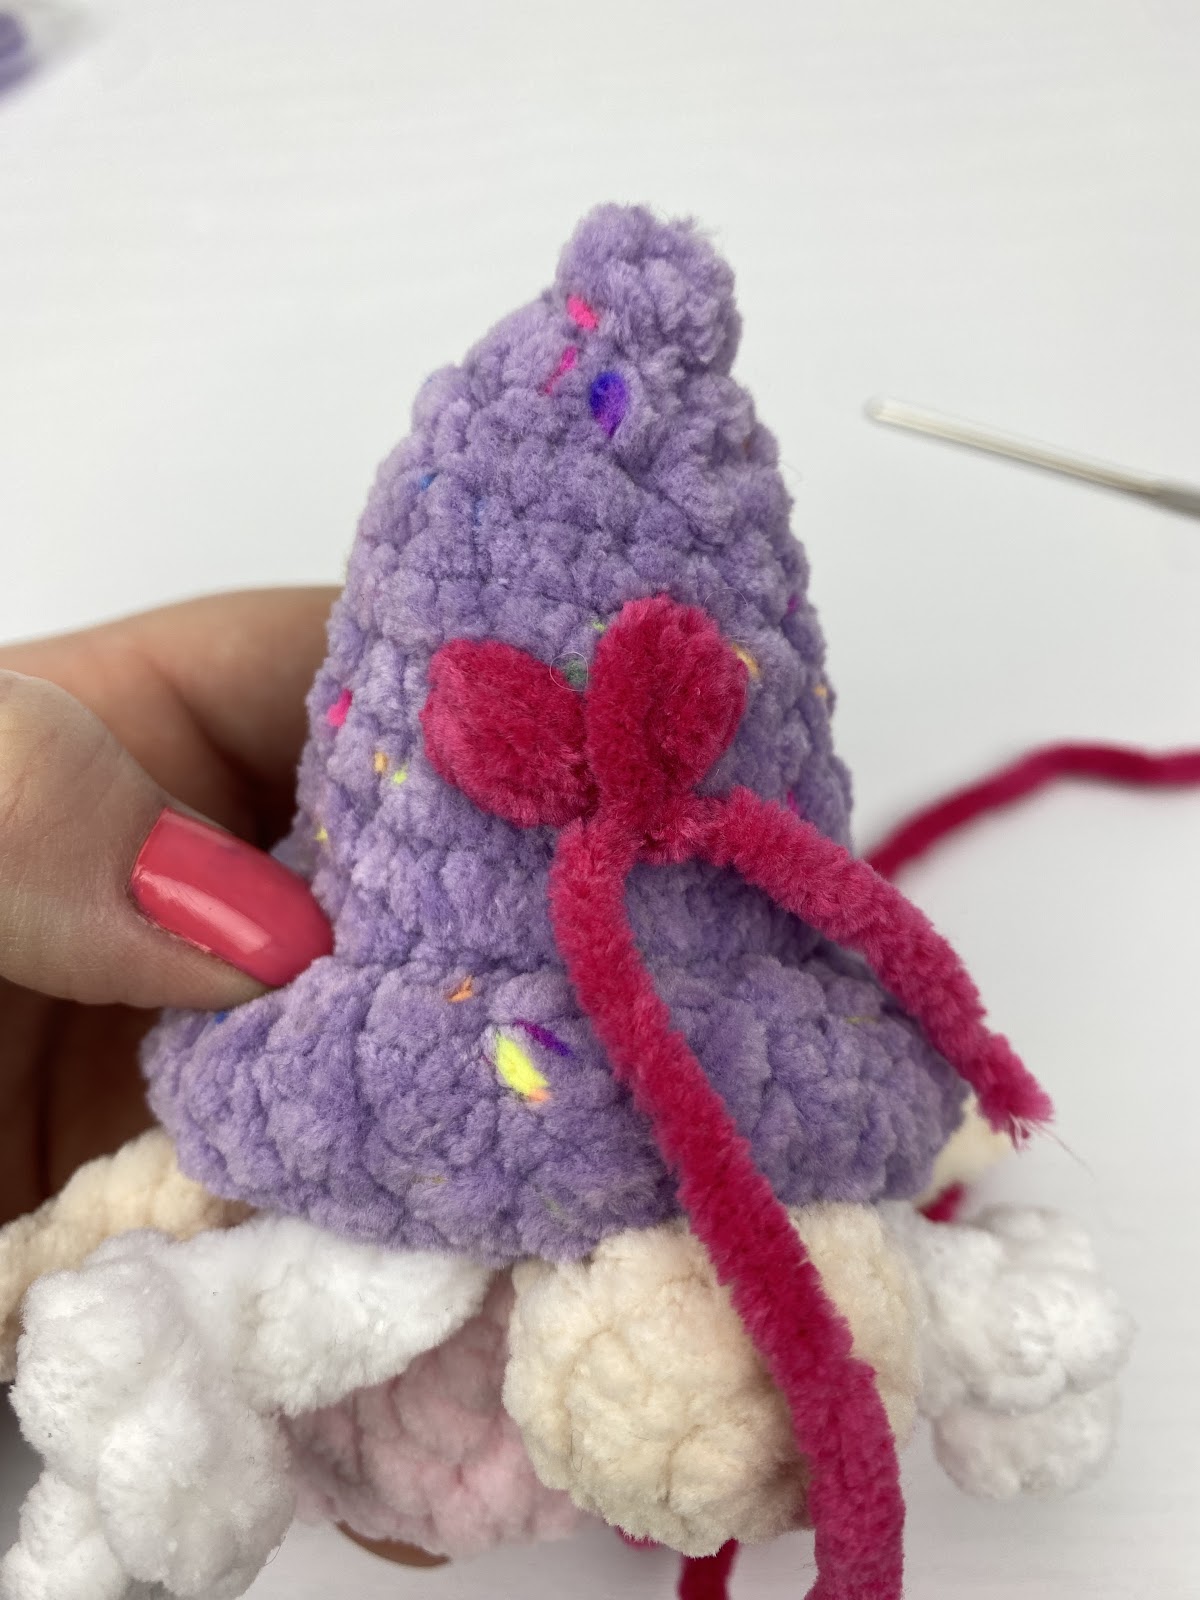 | 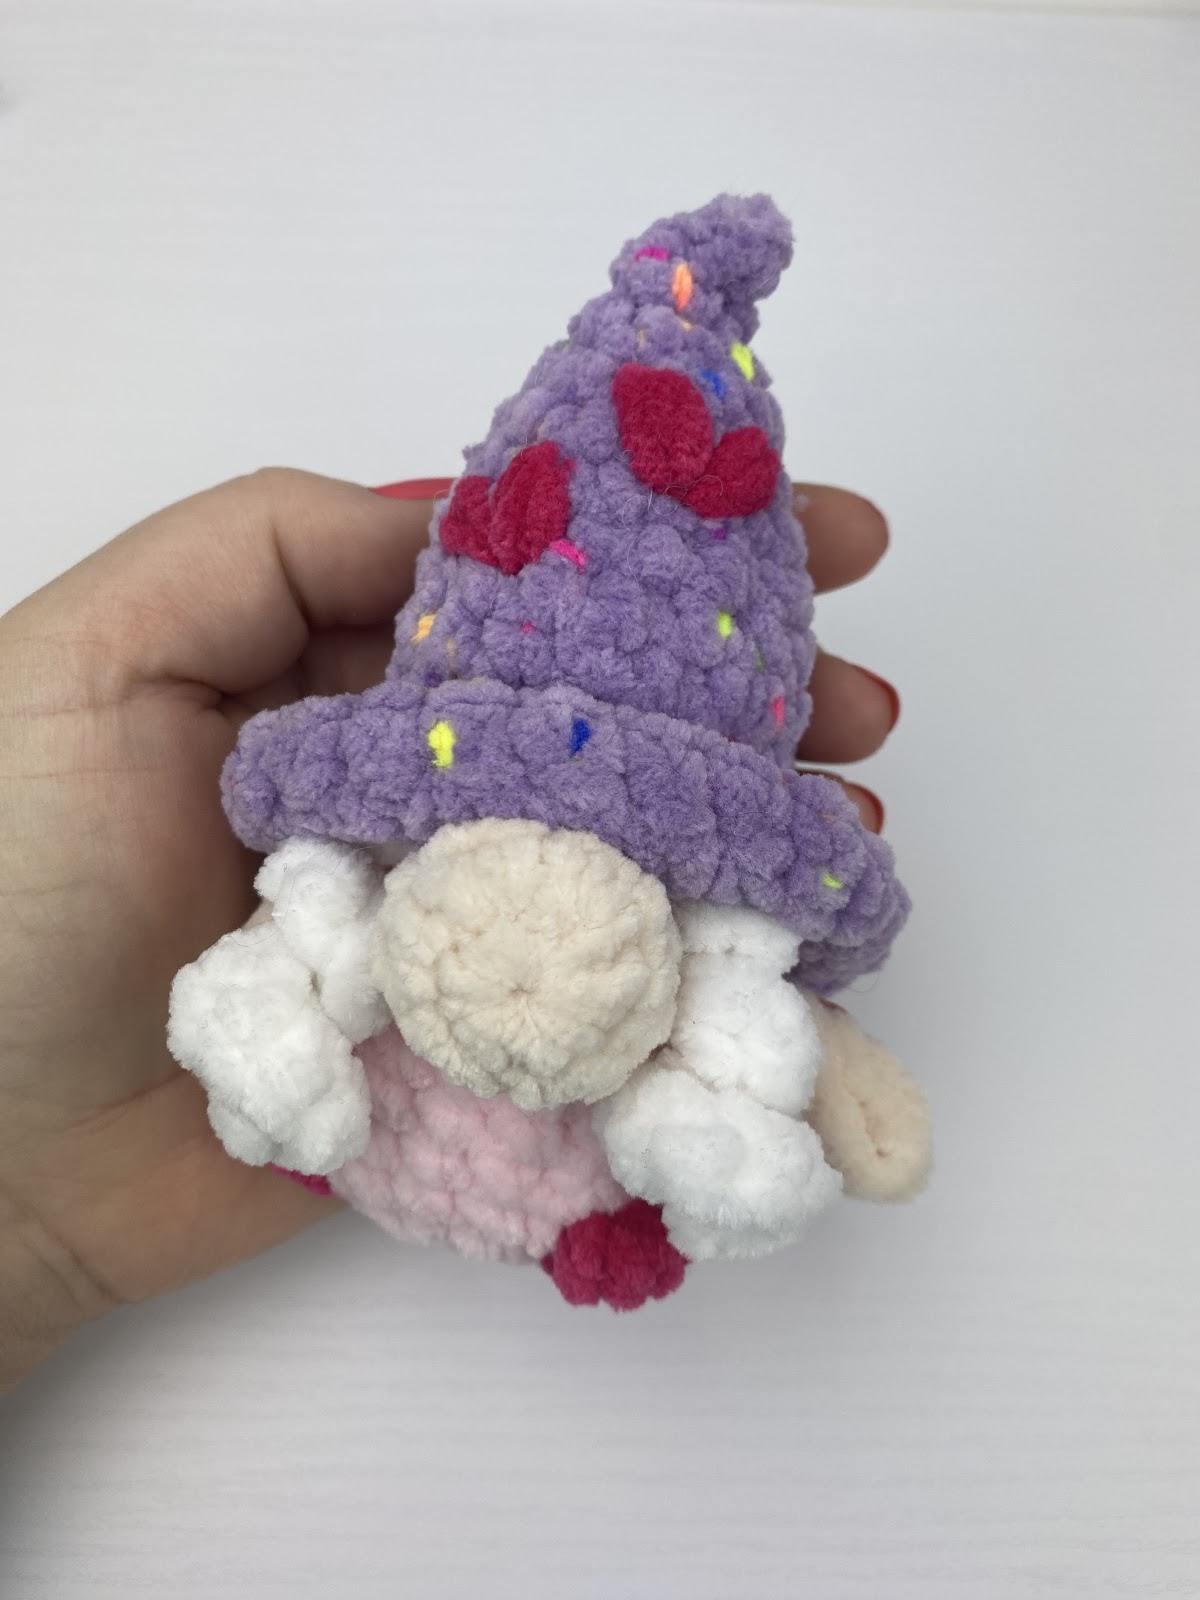 |
Lollipop: Add a lollipop to the Gnome if desired by first pushing through the hat (at approx. Round 2-3, between the nose and arm), then push through the arm closest to the lollipop and then the arm further away.
Mini Valentine Gnomes Crochet Pattern: Striped Hat
Nose/Beard: The nose is worked in continuous rounds with the beard worked in the FLO of Round 4 of the nose.
Crocheting the Nose/Beard: https://youtu.be/Zl2Xgl6gSrA?si=Vs3XYBvHFdik7Eho&t=139
Using Cream, create a Magic Ring
Round 1: 6sc in the ring (6)
Round 2: *2sc* 6 times (12)
Round 3: sc in each st (12)
Round 4: *scdec* 6 times (6), if making the beard change to White, if not making beard, end off, weave in ends.
Before beginning Round 5 mark the back loop of the next 3 sts with stitch markers (these will be used when crocheting the nose onto the body)
Note: In Round 5 the sts shown within the same brackets will be worked into the same stitch.
Round 5: Working in the FLO,
(ss in next st, ch4, beginning in 2nd ch from hook, ss in next 3 chs, ss, ch5, beginning in 2nd ch from hook, ss in next 4 chs),
(ss in next st, ch6, beginning in 2nd ch from hook, ss in the next 5 chs, ss, ch6, beginning in 2nd ch from hook, ss in the next 5 chs),
(ss in next st, ch5, beginning in 2nd ch from hook, ss in next 4 chs, ss, ch4, beginning in 2nd ch from hook, ss in next 3 chs, ss), leave the last 3 sts unworked (6 strands of hair).
End off, weave in ends.
Valentine Gnomes Arms (make 2): The arm is worked in 1 row.
Using Cream, ch 7
Row 1: ss in the 4th ch from the hook, ss in the next 3 chs (4)
End off, leaving a 6” tail.
Valentine Gnomes Body/Head: The body and head are worked in one piece from the bottom up in continuous rounds with the nose/beard crocheted in as you go.
- Attaching Nose – https://youtu.be/Zl2Xgl6gSrA?si=Vs3XYBvHFdik7Eho&t=1620
Using Dark Grey, create a Magic Ring
Round 1: 6sc in the ring (6)
Round 2: *2sc* 6 times (12)
Round 3: *sc in the next st, 2sc* 6 times (18)
Round 4: sc, change to Pink, bobble st, change to Dark Grey, sc in the next 5 sts, change to Pink, bobble st, change to Dark Grey, sc in the next 10 sts (18)
Rounds 5-8: sc in each st (18)
Place the gnome down on a hard surface with the body face ‘up’ and the legs facing you. Locate the centre front st and mark it with a stitch marker (the arms will be placed based on this centre st). Count over 4 sts to the left of the stitch marker and add a stitch marker to the front of this stitch. Count over 4 sts to the right of the Centre stitch marker and add a stitch marker to the front of the stitch. The marked sts are where the arms will be added
If a marked stitch is not the next unworked st of the body then sc until you reach the indicated st. The first stitch of Round 9 should be worked into the marked st on the right hand side (left if left handed). This will line up the nose/beard.
| Round 9: Sc in the next 3 sts, hold your nose in front of your work, with the marked sts (back loops) sitting beside the next 3 sts of the body. Beginning in the ‘back st’ closest to the right (left if left handed), working through both the Nose (inserting the hook from the inside of the st to the outside) and Body (outside to inside), sc in the next 3 sts, working through the body only, sc in the next 12 sts (18). | |
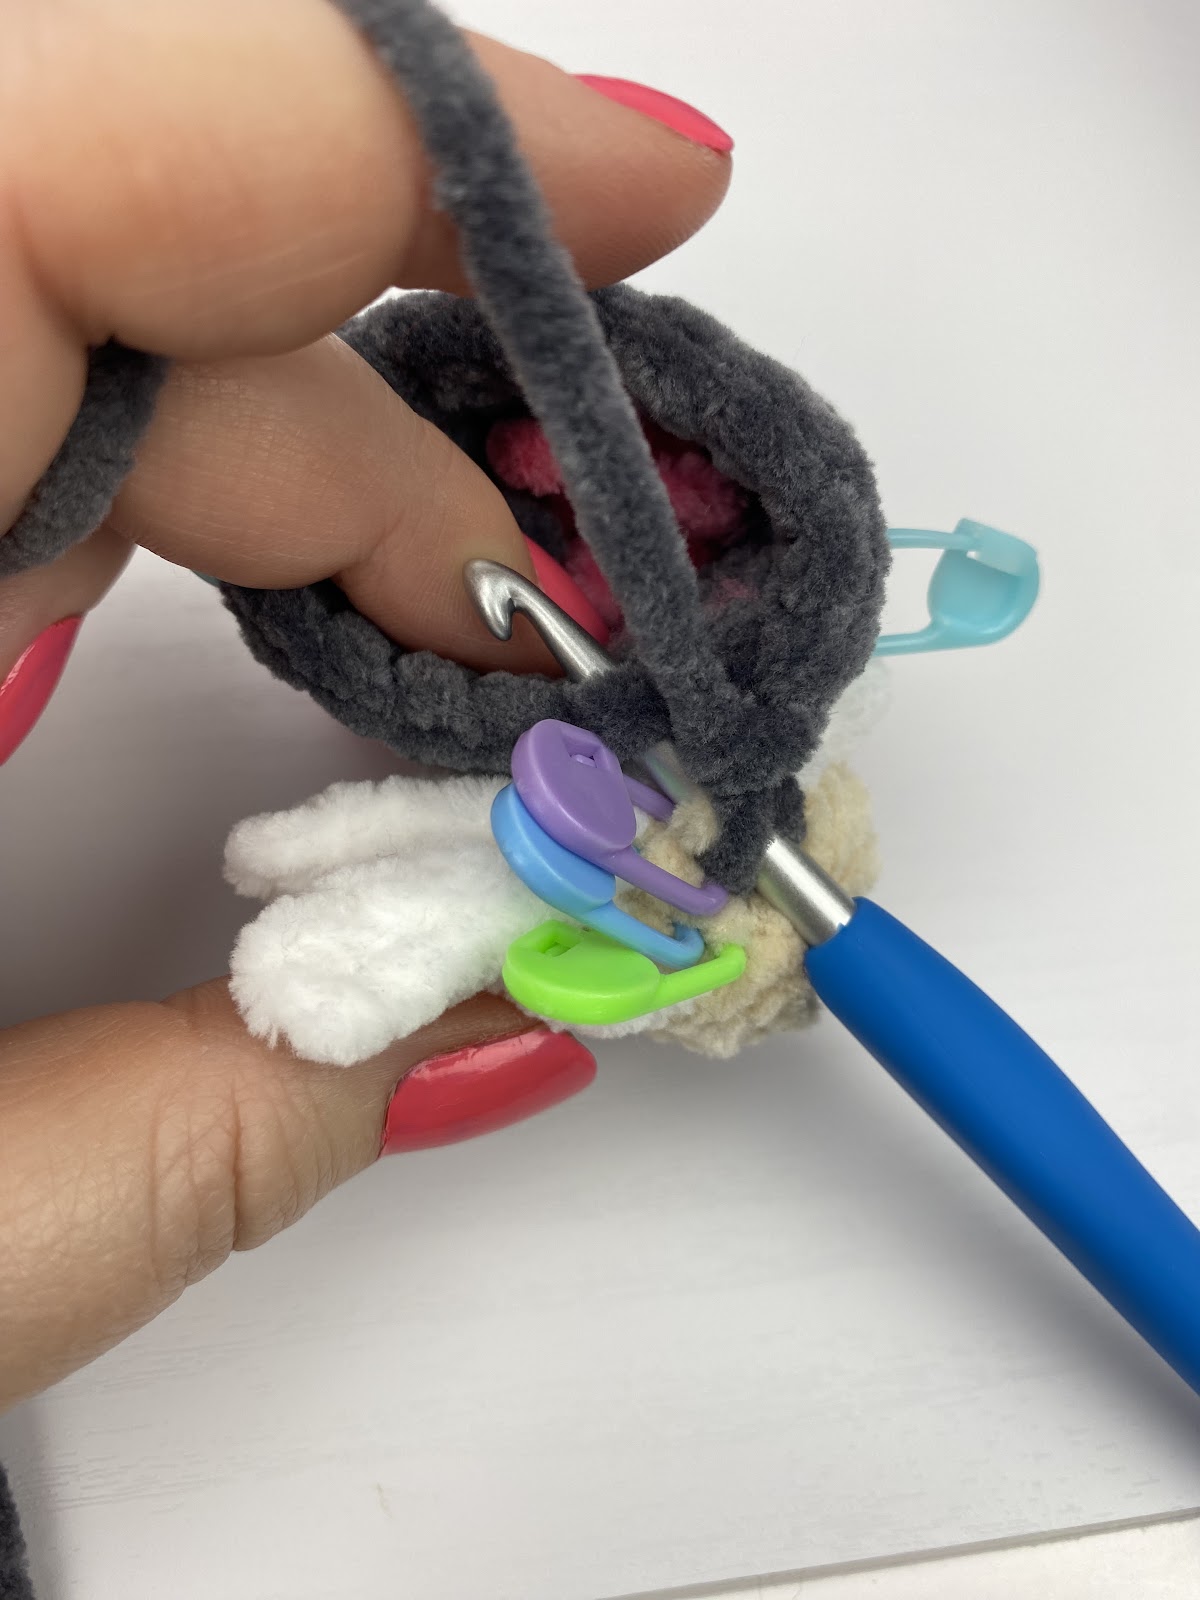 |
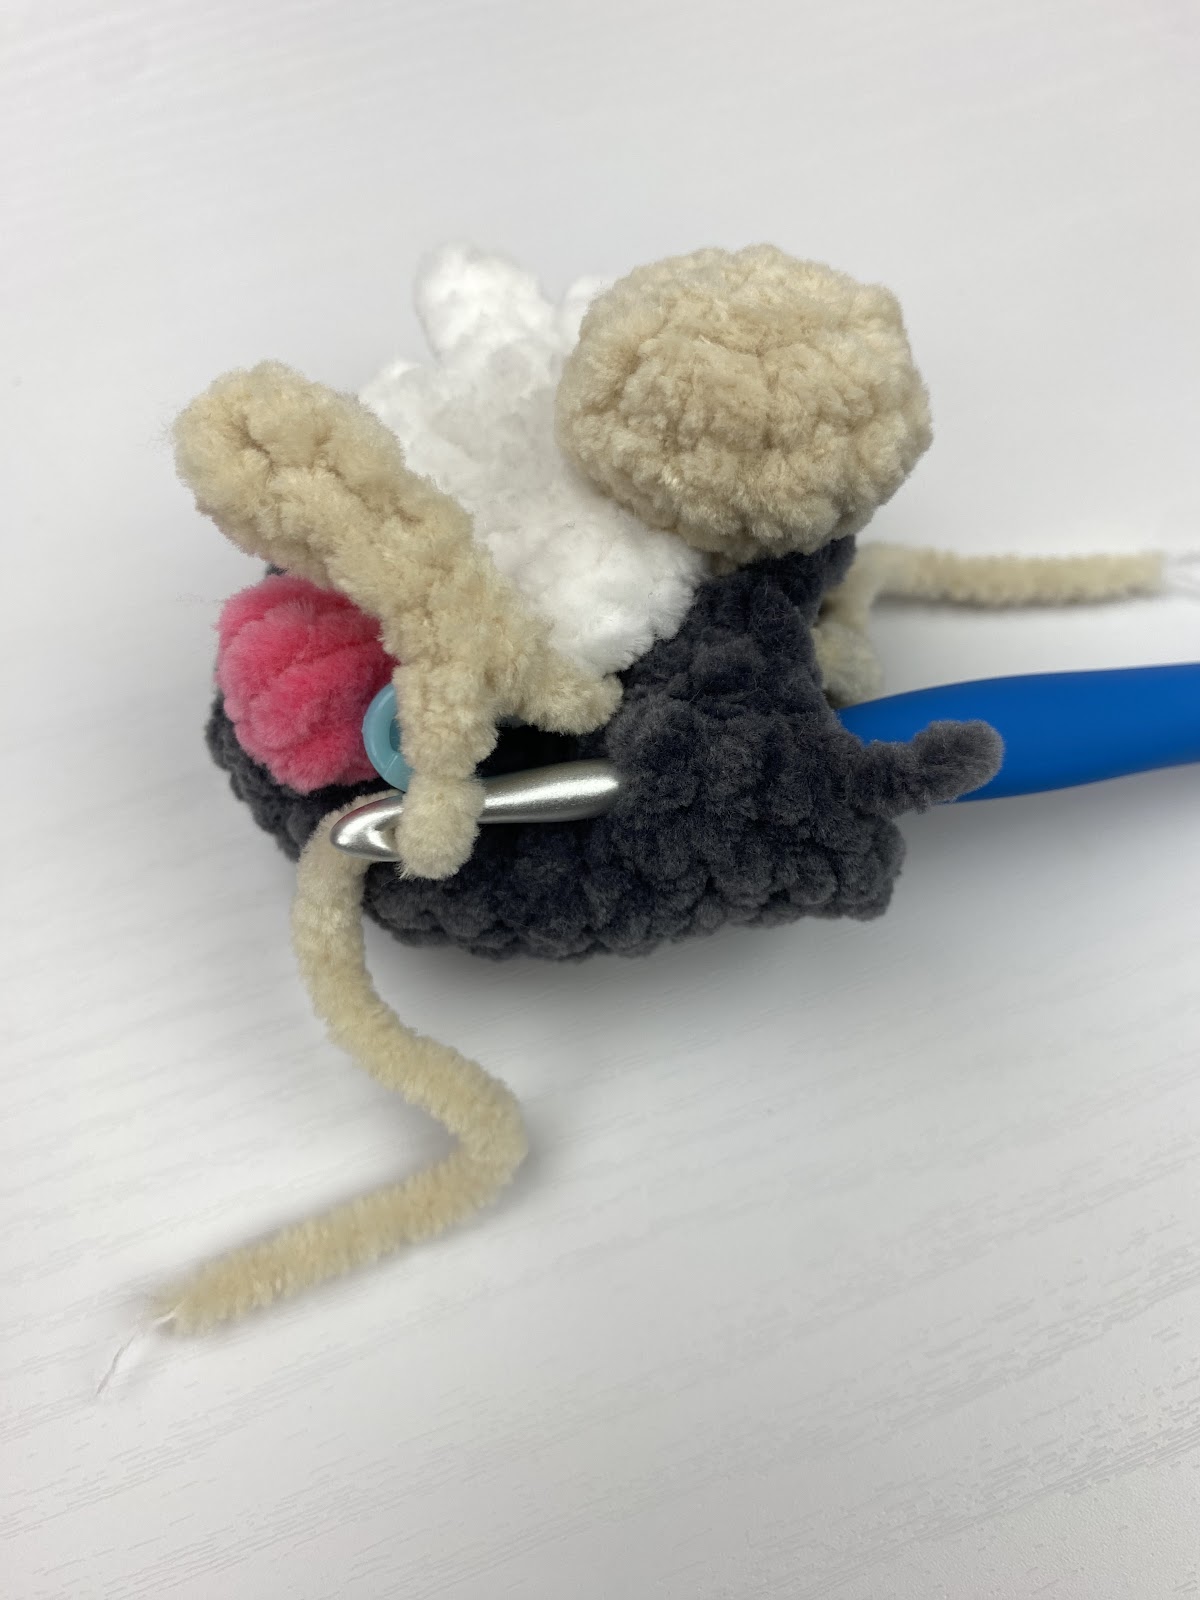
| Round 10: Sc in the next 3 sts, Working through the ‘top sts’ of the nose, sc in the next 3 sts (skip the 3 sts connecting the back of the nose to the body), working through the body only, sc in the next 12 sts (18). End off by ss to next st. Using the leftover tails of yarn from the nose, sew up the little holes created from crocheting the piece on. | |
 |
| Pull the tails of the arms through on either side of each of the marked sts from Round 8 of the body. Tie off inside the body and continue to making the hat. |
 |
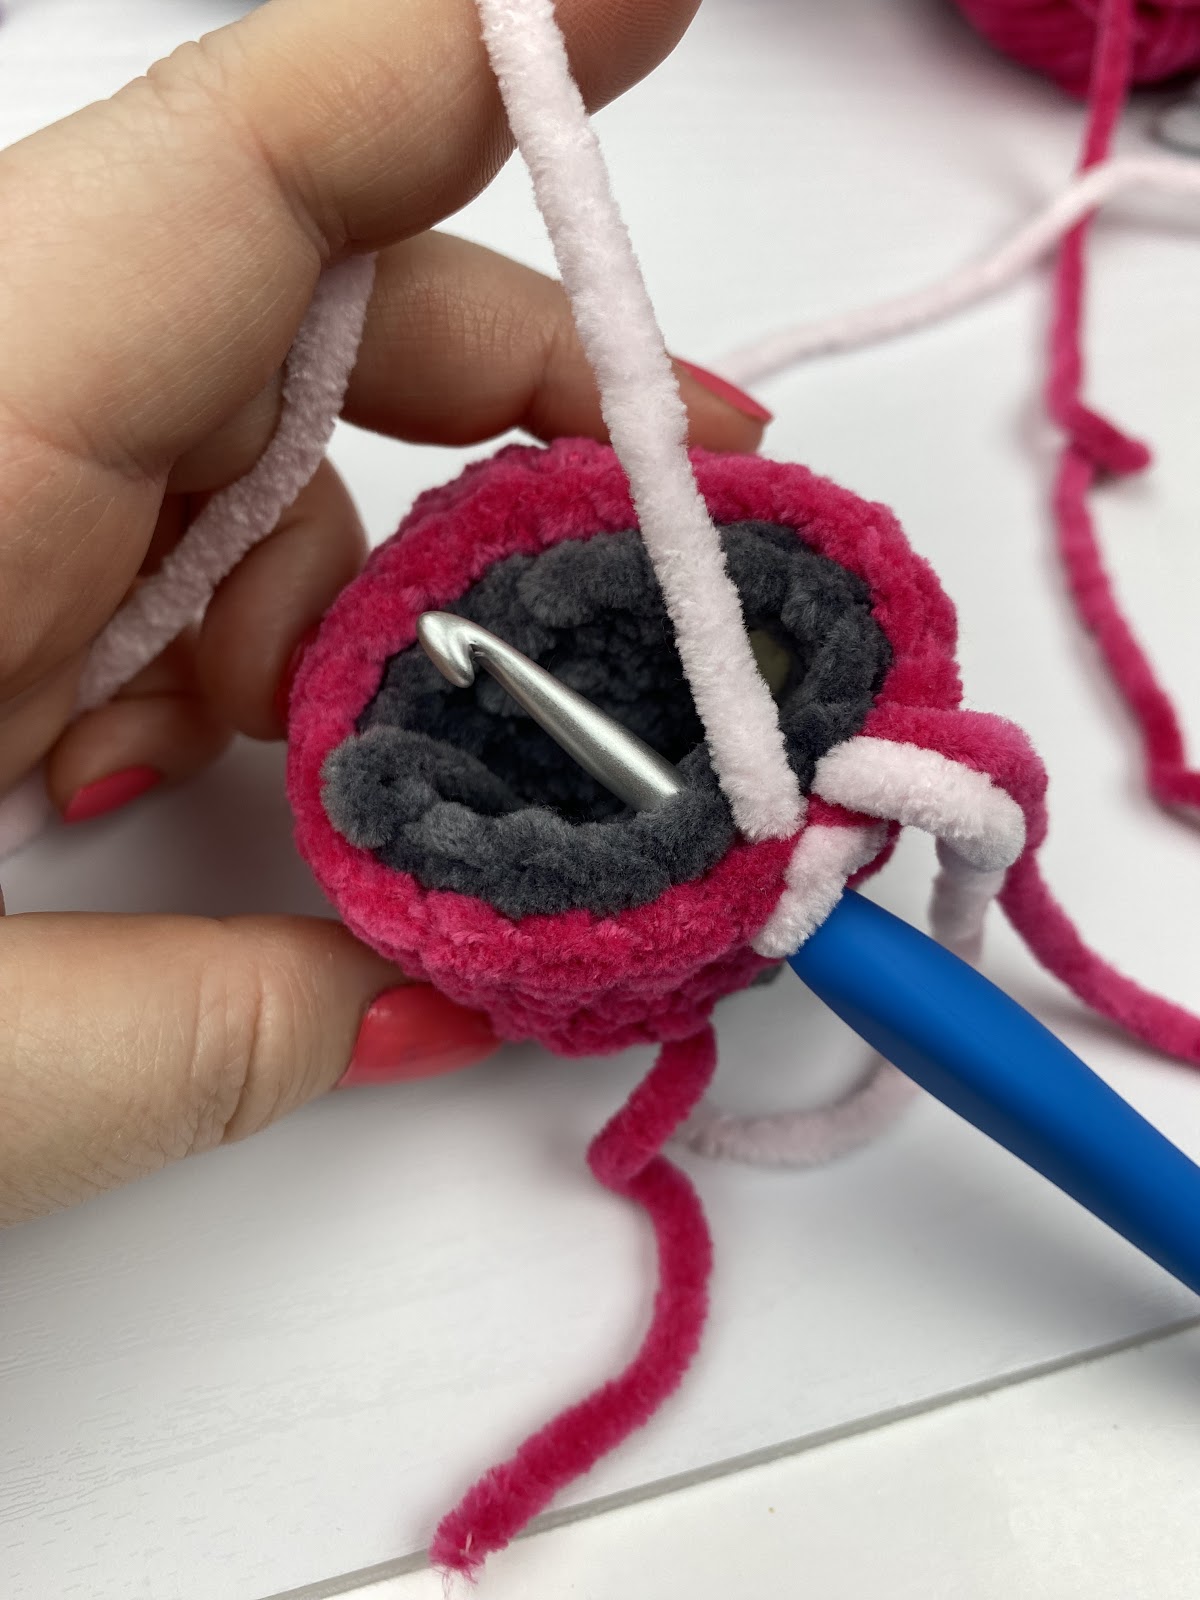
Valentine Gnomes Hat: The hat is worked in continuous rounds beginning from the bottom up and crocheted into the body at Round 6. Work in Dark Pink for the first 5 rounds. Then change colours every round until Round 15
Using Dark Pink, ch 24, join to first ch to create a loop (24)
Round 1: sc in each ch (24)
Round 2: sc in each st (24)
Round 3: *sc in the next 6 sts, scdec* 3 times (21)
Round 4: sc in each st (21)
Round 5: *sc in the next 5 sts, scdec* 3 times (18)
Begin changing colour every Round
Round 6: Place the hat overtop of the body and line up the sts of Round 10 of the Body/Head and Round 5 of the Hat. Working through both pieces for the entire round, sc in each st (18)
Rounds 7-8: sc in each st (18), begin stuffing (add a few river rocks to the bottom if desired to weigh it down).
Round 9: *sc in the next 4 sts, scdec* 3 times (15)
Round 10: sc in each st (15)
Round 11: *sc in the next 3 sts, scdec* 3 times (12)
Round 12: sc in each st (12)
Round 13: *sc in the next 2 sts, scdec* 3 times (9)
Finish stuffing
Round 14: *sc, scdec* 3 times (6)
Round 15: *sc, scdec* twice (4)
Do not end off either Colour
To make hearts on strings, with Dark Pink ss through the 2 sides of the top of the hat together, ch 6, ss in 2nd ch from hook, ss in next 4 chs, ss to the top of the hat (5)
Change to Light Pink, ss through the top of the hat, ch 9, ss in 2nd ch from hook, ss in the next 7 chs, ss to the top of the hat (8)
End off both colours, weave in the ends.
Heart (make 2): Made in 1 Round See small heart Tutorial: https://youtu.be/3jigkNrZFbk
Using Light or Dark Pink, ch 3
Round 1: Working all sts into the 3rd ch from the hook, 3dc, hdc, ch2, hdc, 3dc, ch2, ss, (8)
End off, leaving a 6” tail for sewing. Sew the heart onto the end of the string made.
Lollipop: Add a lollipop to the Gnome if desired by first pushing through the hat (at approx. Round 2-3, between the nose and arm), then push through the arm closest to the lollipop and then the arm further away.
Congratulations!
You have now completed your Low Sew Mini Valentine Gnomes Free Crochet Pattern!
Easy Cute Gnome Amigurumi for Beginners
Ever wanted to try to crochet amigurumi, but felt a little intimidated? This cute gnome crochet pattern is the perfect place to start! This free pattern is designed with beginners in mind, so you don’t need to be a crochet pro to make your own adorable gnome.
Each step is broken down into super clear, step-by-step instructions, and there are tons of photos to guide you along the way. You’ll mostly be using basic stitches like single crochet, which is like the bread and butter of crochet—easy to learn and super versatile. Plus, because these gnomes are mini, they work up really quickly, so you’ll have a finished project in no time! It’s a great way to learn a new skill and have something cute to show off.
Plus! There’s a free video tutorial to follow along with too! Visual learners can follow along with me, while keeping the written pattern close by for reference.
Think of this cute gnome amigurumi project as your crochet training wheels. Once you master these little guys, you’ll feel so much more confident tackling other crochet projects. This pattern is all about having fun and learning in a relaxed way. No complicated techniques or fancy stitches here! Just simple, straightforward instructions that will help you create agorgeous little gnome you can be proud of. These little gnomes are a great way to dip your toes into the world of crochet and create something cute and cuddly at the same time.
Beginners! Check out this post next!
Easy, NO-SEW Crochet Amigurumi Patterns for Beginners
We love seeing your finished projects. Tag us in your photos and posts using #DarlingMapleDesigns or @DarlingMapledesigns.
Thank you so much for joining us! I hope you loved completing your Mini Valentine Gnomes as much as I enjoyed designing it. Don’t want to miss a stitch? Subscribe to the Darling Maple Designs newsletter and I’ll send updates for new pattern releases, sales and promotions straight to your inbox. See you again soon! Sara <3
If you’re loving gnomes! There’s even more gnomie patterns here >
How about the Best Crochet Gnome Patterns Round up?
If you have any questions or concerns with this, or any other pattern written by Darling Maple Designs, please do not hesitate to contact me at: info@darlingmapledesigns.com.
Don’t forget to Pin it to your project board.


