
This free horse crochet pattern is the latest addition to my farm animal collection! It’s a low-sew amigurumi that’s super soft and cuddly, made with delicious velvet or plush yarn. Kids and adults are both drawn to horses, perhaps it’s their size, or their strength or maybe their big brown eyes? I’m sure you’ll love this easy crochet pattern, and can’t wait to make your own.

Make the Perfect Crochet Horse for Gifts
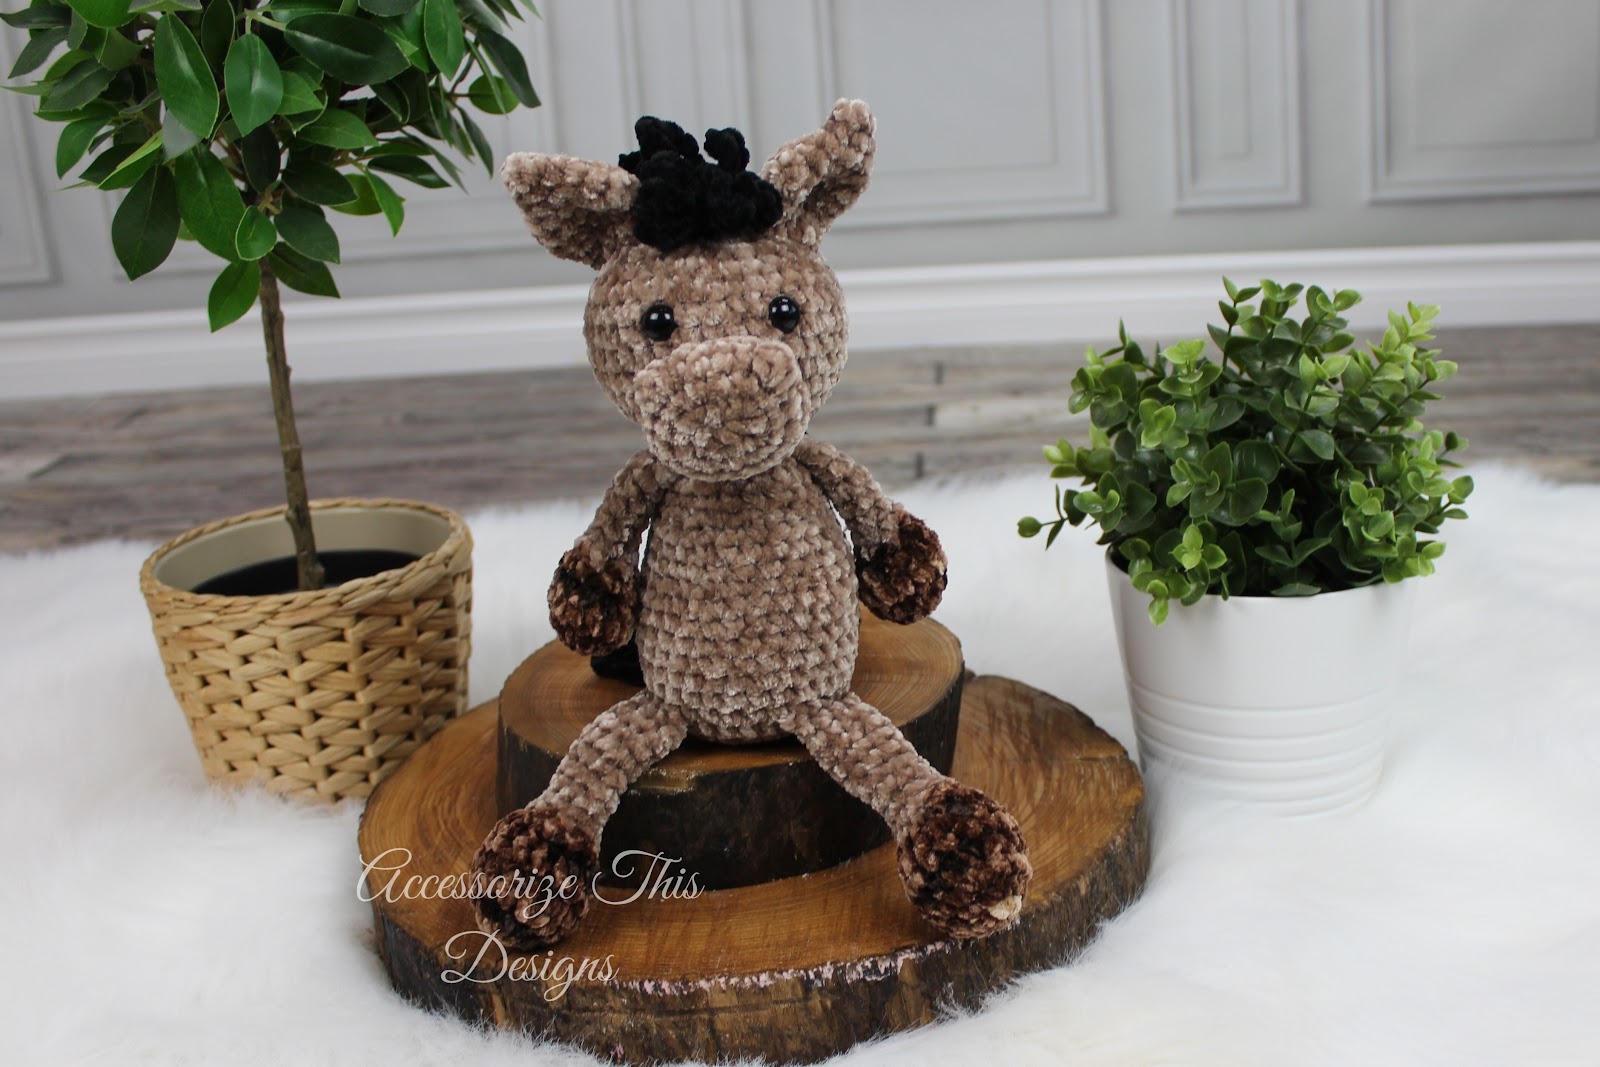
To make this friendly horse plush, I’ve used black yarn for his mane and two shades of brown yarn for his body and hooves. But of course, you can create any colour of horse you like! Or if you’re making this horse amigurumi for a horse lover, what’s their favourite breed? There’s plenty of photos on the internet, so that you can match this horse crochet pattern to match colours with their favourite horse breed!
This sweet little guy is designed using super soft Bernat Velvet (5), Bernat Crushed Velvet (5), with 12 mm (Velvet) black safety eyes (from Amazon). Also shown above with Hobbii Honey Bunny yarn (6) and 15 mm black safety eyes. He could easily be made with your favourite worsted weight yarn and smaller hook (see my post about how to adjust). He’s worked from the bottom up, with a no sew limb option. This pattern includes video tutorials to assist you as you work through the pattern. This pattern uses a bobble stitch to outline his nostrils and chained loop mane/tail.
If you have any questions or concerns with this, or any other pattern written by Darling Maple Designs, please do not hesitate to contact me at: info@darlingmapledesigns.com.
Crocheted Horse Therapy? What’s that?
There’s something undeniably comforting about horses. Their large size, gentle nature, and calming presence have made them valuable companions for centuries. Now, you can bring that comfort right into your home with a crocheted horse therapy toy.
As a mama, I’m no stranger to a child needing some extra TLC at times. I find that plush softie dolls can provide additional comfort when we’re not able to. When we’re driving, when our child is in bed, or when we’re busy, distracted or physically elsewhere… a crocheted amigurumi made from super soft yarn, can step in! This is a soft, huggable horse toy designed for comfort and stress relief. A Similar idea, to when older children that benefit from Horse Therapy, from the animal itself!
This free crochet pattern is specifically designed to create a soft, huggable horse that provides sensory stimulation and emotional support. Here’s why it’s a perfect project for anyone who works with children or adults seeking stress relief:
- Soft and Huggable: Made with cuddly yarn, this crocheted horse offers a calming tactile experience. The soft texture can be soothing for those who find comfort in physical touch.
- Customizable for Different Needs: The beauty of crochet is its adaptability! You can adjust the size of the horse to create a snuggly toy for children or a lap-sized companion for adults. Consider using different yarn textures for a more stimulating experience.
- Safe and Secure: Crocheted toys are generally free from small parts or sharp edges, making them safe for children of all ages. You can ensure even greater safety by using safety eyes – or perhaps embroidery eyes – and avoiding embellishments that could come loose.
- Promotes Emotional Well-being: Horses are well-known therapy animals, and a crocheted horse toy can serve as a constant companion, offering a sense of security and comfort. It can be a valuable tool for children dealing with anxiety, separation issues, or emotional trauma.
This crocheted horse crochet pattern is more than just a craft project; it’s a potential source of comfort and well-being for those who need it most. By sharing this pattern, you can empower parents, therapists, and caregivers to create a handmade companion that offers cuddles, comfort, and a touch of equine magic.
What you will need for your Flip Flop Horse Crochet Pattern
Includes helpful stitch and process video tutorials
Materials:
Hook size 5.5 mm (I)
Main Colour – Bernat Velvet Mushroom (75 yards)
Accent Colours –
Bernat Crushed Velvet Coffee (25 yards)
Bernat Velvet Black – (25 yards)
- Polyester filling – small amount
- 2 – 12mm black safety eyes (not suitable for children under 3): see video for embroidering sleepy eye as an alternative.
- Stitch Markers or Safety pins to help with sewing placement
- Yarn needle to weave in the ends

Gauge:
4 Rounds of Gauge Pattern = 2.0 inch diameter
Gauge Pattern:
Create a Magic Ring
Round 1: 6sc in the ring (6)
Round 2: 2sc in each st (12)
Round 3: *sc, 2sc* 6 times (18)
Round 4: *sc in the next 2 sts, 2sc* 6 times (24)
Abbreviations:
| Bobble st | bobble stitch |
| ch | chain |
| sc | single crochet |
| scdec | single crochet decrease |
| ss | slip stitch |
| st(s) | stich(es) |
| *to* | repeat the sequence between the ** the number of times indicated |
| YO | Yarn Over |
Special Stitches & Techniques:
Bobble Stitch – *YO, insert hook into indicated st, YO, pull up loop, YO, pull through 2 loops on hook* 3 times, YO, pull through all 4 loops on hook.
Magic ring
Making the mane
No Sew Method Attaching Legs
No Sew Method Attaching Arms
Sleepy Eyes
Notes:
- #sc, eg. (2sc, 3sc, etc) shows the number of scs to be completed in the indicated st
- Sts listed between brackets are all worked in the same st, eg. (hdc, dc)
- I highly recommend using a stitch marker to help keep track of the rounds for the body/head
- The pattern has both a ‘sew’ and no sew option for the limbs shown in the Body/Head section.
Recommended Sequence:
It is highly recommended to complete the Flip Flop patterns in the order they are written (especially if you are using the no-sew option for the limbs).

Start your Flip Flop Horse Crochet Pattern
Flip Flop Horse Arms (make 2):
The arms are worked from the “hoof” to the body, in continuous rounds.
Using Accent Colour (Coffee), create a Magic Ring
Round 1: 6sc in the ring (6)
Round 2: *2sc* 6 times (12)
Round 3-4: sc in each st (12)
Round 5: *sc in the next 2 sts, scdec* 3 times (9), change to Main Colour.
Round 6: *sc, scdec* 3 times (6)
Stuff only the ‘hoof’ portion of the arm, the rest will be left unstuffed.
Rounds 7-12: sc in each st (6)
Flatten and sc through both sides (3sts).
End off leaving a 12 inch tail if sewing.
Flip Flop Horse Legs (make 2):
The legs are worked from the “hoof” to the body, in continuous rounds.
Using Accent Colour (Coffee), create a Magic Ring
Round 1: 6sc in the ring (6)
Round 2: *2sc* 6 times (12)
Round 3: *sc in the next 3 sts, 2sc* 3 times (15)
Rounds 4-6: sc in each st (15)
Round 7: *sc in the next 3 sts, scdec* 3 times (12), change to Main Colour.
Round 8: *sc in the next st, scdec* 4 times (8)
Stuff only the ‘hoof’ portion of the leg, the rest will be left unstuffed.
Rounds 9-16: sc in each st (8)
Flatten and sc through both sides (4 sts).
End off, leaving a 12 inch tail if sewing.
Flip Flop Horse Body/Head:
The body and head are worked in one piece from the bottom up in continuous rounds.
Option 1: Sewing the Legs and Arms to the body
If you are sewing your legs and arms onto your body then ‘sc in each st’ for Round 6 and Round 21.
Option 2: Crochet Legs and Arms to the body
If you are crocheting your legs and arms onto your body please follow the pattern as written for the Body/Head.For assistance in crocheting the limbs on see Videos:
Attaching Legs
Attaching Arms
Using Main Colour, create a Magic Ring
Round 1: 6sc in the ring (6)
Round 2: *2sc* 6 times (12)
Round 3: *sc in the next st, 2sc* 6 times (18)
Round 4: *sc in the next 2 sts, 2sc* 6 times (24)
Round 5: *sc in the next 3 sts, 2sc* 6 times (30)
Round 6 Option 1: sc in each st (30)
Option 2: Hold your first leg in front of your work (body). Working through both pieces, sc in the next 4 sts, working through the body only, sc in the next 5 sts, Hold the second leg in front of your work (body). Working through both pieces, sc in the next 4 sts, working through the body only, sc in the last 17 sts (30).

Rounds 7-12: sc in each st (30)
Round 13: *sc in the next 3 sts, scdec* 6 times (24)
Rounds 14-16: sc in each st (24)
Note: You may want to begin stuffing
Round 17: *sc in the next 2 sts, scdec* 6 times (18)
Round 18-19: sc in each st (18)
Round 20: *sc in the next st, scdec* 6 times (12), end off, weave in end.
Round 21 Option 1: sc in each st (12)
Option 2: Place the animal down on a hard surface with the body face ‘up’ and the legs facing you. Locate the 3 centre front sts and mark them with a stitch marker (the arms will be placed on either side of these sts). Locate the far right marked st. Count over 3 sts to the right of it and attach your yarn to the body. (If left handed you will locate the left st and count over 3 sts to the left).
Place the first arm in front of the body to the right of the marked sts (left if you’re left handed). Working through both pieces (beginning with the first st of the arm and the stitch on the body you attached your yarn to), sc in the next 3 sts.
Working through the body only, sc in the next 3 sts (these are your marked sts). Place the second arm in front of your work (body). Working through both pieces, sc in the next 3 sts, working through the body only, sc in the last 3 sts (12).


Round 22: *sc in the next st, 2sc* 6 times (18)
Round 23: *sc in the next 2 sts, 2sc* 6 times (24)
Round 24: *sc in the next 3 sts, 2sc* 6 times (30)
Round 25: *sc in the next 4 sts, 2sc* 6 times (36)
Rounds 26-31: sc in each st (36)
Add safety eyes to Round 29 approximately 4-5 sts apart, continue stuffing.
Round 32: *sc in the next 4 sts, scdec* 6 times (30)
Round 33: *sc in the next 3 sts, scdec* 6 times (24)
Round 34: *sc in the next 2 sts, scdec* 6 times (18)
Finish stuffing
Round 35: *sc, scdec* 6 times (12)
Round 36: *scdec* 6 times (6)
End off leaving a 6 inch tail, cinch the last 6 sts together and weave in the end.
Flip Flop Horse Muzzle:
Made in continuous oval rounds.
Using Main Colour, ch 4
Round 1: sc in the 2nd ch from the hook, sc in the next ch, 3sc in the last chain, turn (rotate) and begin working in the bottom of the ch, sc in the next ch, 2sc in the last ch (8)
Round 2: 2sc, sc in the next st, *2sc* 3 times, sc in the next st, *2sc* twice (14)
Round 3: sc, 2sc, sc, *sc, 2sc* 3 times, sc, *sc, 2sc* twice (20)
Round 4: sc, bobble st, sc in the next 4 sts, bobble st, sc in the last 13 sts (20)
Round 5: sc in each st (20)
Round 6: *sc in the next 8 sts, scdec* twice (18)
End off leaving an 18 inch tail for sewing.
Flip Flop Horse Ears: (make 2)
Made in continuous rounds beginning at the tip of the ear.
Using Main Colour, create a Magic Ring
Round 1: 4sc in the ring (4)
Round 2: *sc, 2sc* twice (6)
Round 3: *sc, 2sc* 3 times (9)
Round 4: *sc in the next 2 sts, 2sc* 3 times (12)
Round 5: *sc in the next 3 sts, 2sc* 3 times (15)
Round 6: sc in each st (15)
Round 7: *sc in the next 3 sts, scdec* 3 times (12)
Round 8: sc in each st (12)
Round 9: *sc, scdec* 4 times (8)
Do not stuff, ss in the next st, flatten and sc through both sides (4sts). End off leaving 12 inch tail for sewing.
Flip Flop Horse Mane:
Made in 1 row. The entire row will be worked into the starting chain with 3 – 10ch loops worked into each ch. See Video
Using Accent Colour (Black), ch 25
Row 1: ss into the 11th chain from the hook, *ch 10, ss into the same chain* twice, *ch 10 ss into the NEXT ch, ch 10, ss in the SAME ch, ch 10, ss into the SAME ch* 14 times
End off leaving a 24 inch tail for sewing.
Flip Flop Horse Tail:
Made in continuous rounds beginning at the tip of the tail.
Using Accent Colour (Black), ch 4, join to the first chain to create a loop
Round 1: *Ch 20, ss in the loop* 12 times
End off, leaving a 12 inch tail.
How to assemble your Flip Flop Horse Crochet Pattern
Sewing Placement – I highly recommend pinning ALL parts in place BEFORE sewing to make sure everything sits properly and is to your liking 🙂
| Note: Disregard sewing the legs and arms if you’ve already crocheted them on. Legs: Place the legs at approx Round 5 of the body about 4 sts apart.Sew in place. When sewing the legs in place I sewed the top of the last FULL ROUND DOWN instead of just the sts from crocheting the round together. |
| Arms: Place the arms at approx Round 21 of the body, approx 3 sts apart. Sew in place. When sewing the arm in place I sewed the top of the last FULL ROUND DOWN instead of just the sts from crocheting the round together. |
| Muzzle: Centre the muzzle on the body placing it between Rounds 23 and 28 on the head. Stuff lightly and sew down along Round 3 of the muzzle. |
| Ears: Place the inner side of the ears on Round 34 of the body with 5 sts between. Angle the outer portion of the ear down 2 round and away from the face 5 sts. Sew in place. |
| Mane: Centre between the ears. Place the beginning chain of the mane down between the ears and stretch it down the back of the head. Sew in place. |
| Tail: Centred on the back of the body. Place between Rounds 5 and 6 of the body. Sew in place along the starting ring. |
Congratulations!
You have now completed your Flip Flop Horse Crochet Pattern.
You might also love my Crochet Cow Pattern Round Up!!
22 Adorable Crochet Cow Patterns
We love seeing your finished projects. Tag us in your photos and posts using #DarlingMapleDesigns or @darlingmapledesigns.
Thank you so much for joining us! I hope you loved completing your Flip Flop Horse Crochet Pattern as much as I enjoyed designing it. Don’t want to miss a stitch? Subscribe to the Darling Maple Designs newsletter and I’ll send updates for new pattern releases, sales and promotions straight to your inbox. See you again soon! Sara <3
If you’ve loved this advanced beginner amigurumi pattern? And you want to make more horses? Then please check out my other free crochet horse patterns!
If you have any questions or concerns with this, or any other pattern written by Darling Maple Designs, please do not hesitate to contact me at: info@darlingmapledesigns.com.
Don’t forget to Pin it to your project board.

