
It doesn’t matter if it’s frosty or not where you are this Christmas. You can craft a super cute Candy Cane Crochet Snowman Ornament using this free crochet pattern! This unique snowman decoration features mini candy canes as limbs, making your ornaments irresistibly adorable.
I’ve made sure to design a quick and easy, low-sew amigurumi pattern that will be loved by all. So that you’ll have a great addition for your market stall offerings, a gorgeous tree decoration or quick gift idea! Add this lovable design to your holiday traditions and watch it become a favourite, year after year!
It’s Easy to Grab the Whole Candy Cane Holder Collection !
There are (16) Sixteen patterns in the Candy Cane Holder Ornament collection! And you can grab all of this cuteness straight away, in the Crochet Candy Canes Bundle e-book!
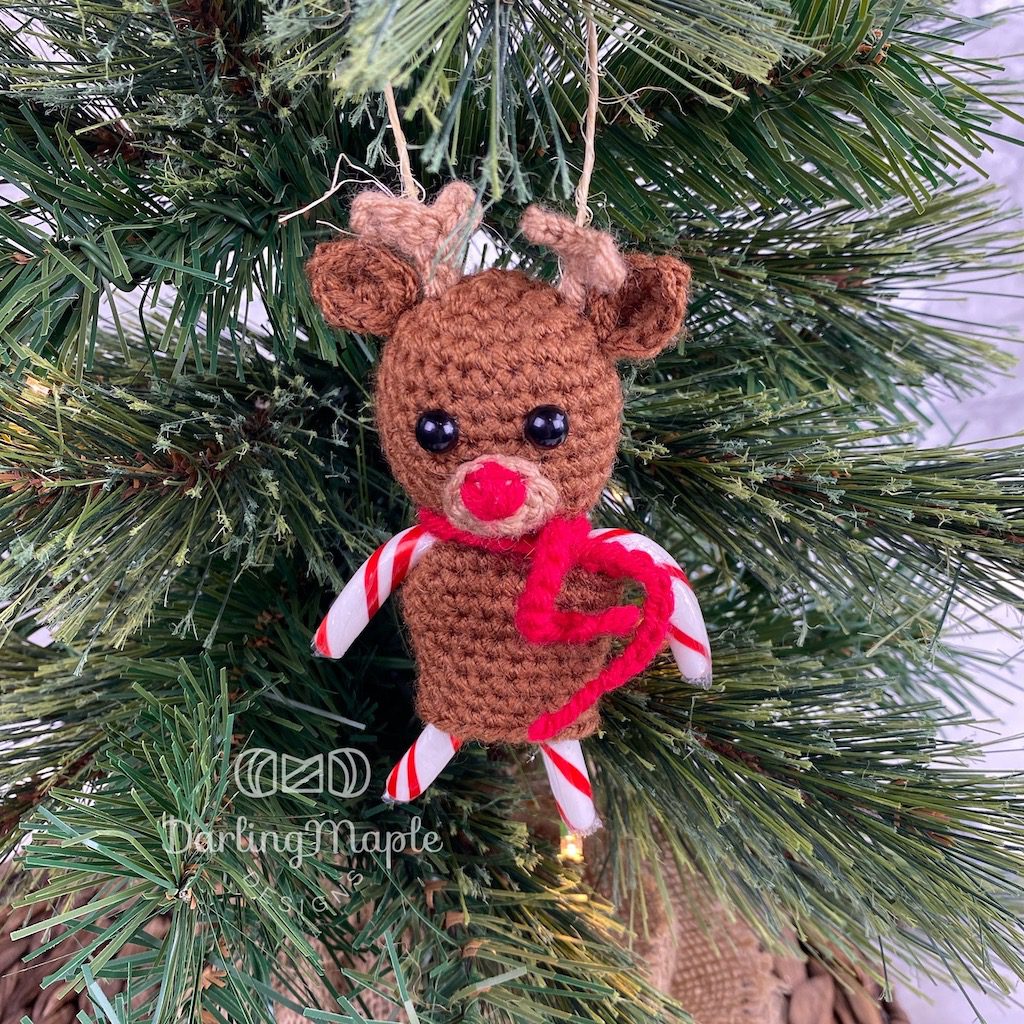
The Candy Cane Ornament Bundle includes the FULL 16 pattern collection, with process photos, tutorial links and a clickable table of contents!This crochet pattern collection includes this cute mini moose candy cane ornament, along with instructions to create his friends! The Santa, Snowman, Reindeer, Kitty, Dinosaur, Unicorn, Bear, Puppy, Mrs. Claus, Elf, Mouse, Gingerbread Boy, Gingerbread Girl, Penguin, and Giraffe!

Make Your Own Candy Cane Ornaments
There’s lots of reasons to make a whole lot of snowman candy cane ornaments!
- Cute mini candy canes are used for the arms and legs, making them extra cute.
- Great for teacher gifts, craft fair stock, or adding to your own tree decorations.
- This low-sew pattern works up quickly, with the head and body crafted as one piece for easy assembly.
Materials Used to Make These Candy Cane Holders
The whole candy cane ornament series has been designed with high-quality yarn and thoughtful details to ensure a beautiful finish. These materials come together to make adorable, keepsake ornaments you’ll love decorating with each year.
- The yarn used is WeCrochet Brava Worsted (4) and Brava Tweed Worsted (4) for a soft feel and vibrant colours.
- The eyes are created with 6mm flat back black pearls (hot glued), or you can use 6mm safety eyes, or embroidered eyes as alternatives. Safety Note: Flat back pearls and safety eyes can be a choking hazard for children under 3.
- Add optional accessories with twine, bells, and additional yarn (use your scrap yarn!) for accents.

Check out the Candy Cane Crochet Snowman Ornament pattern below, or grab the inexpensive ad-free PDF with additional helpful photos on Ravelry or Etsy
Want to stay up to date on all the Darling Maple Designs happenings? Then be sure to subscribe to my newsletter ![]()
Thank you so much for being here and crocheting with me ![]() .
.
Please share your work by tagging me on FB or IG @darlingmapledesigns or use #darlingmapledesigns for a chance to have your work featured in my IG stories! ![]() Sara
Sara

Interested in more cute crochet patterns? Check these out!
What you will need for your Candy Cane Crochet Snowman Ornament Pattern
Materials:
Hook size 3.75 mm (F) Clover Amour
Yarn: Medium Weight (4) – Shown using Knit Picks Brava Worsted
| Main Colour | |
| White | 25 yards |
| Accent Colours | |
| Black, Green, Burgundy, Orange | Small Amount |
| Curly Cue Arms/Legs (Colour of Choice) (Optional) | 15 yards |
- 6mm safety eyes OR 6mm flat back black pearls (optional)
- 4mm flat back pearl (optional)
- Polyester filling
- 2 Mini Candy Canes (approx. 3″ long)for the arms/legs
- Twine (optional)
- 4 x 10mm Bells (optional for Curly Cue arms/legs)
- Stitch Markers & Safety pins to help with sewing placement
- Yarn needle to weave in the ends

Gauge:
4 rounds of sc = 1.5 inches diameter
Gauge Pattern:
Create a Magic Ring
Round 1: 6sc in the ring (6)
Round 2: 2sc in each st (12)
Round 3: *sc, 2sc* 6 times (18)
Round 4: *sc in the next 2 sts, 2sc* 6 times (24)
Abbreviations:
| BLO | Back Loop Only |
| ch | chain |
| FLO | Front Loop Only |
| hdc | half double crochet |
| sc | single crochet |
| scdec | single crochet decrease |
| sk | skip |
| ss | slip stitch |
| st(s) | stich(es) |
| *to* | repeat the sequence between the ** the number of times indicated |
Special Stitches & Techniques:
Magic ring
Sleepy Eye (if not using safety eyes/flat back pearls)
How to Close the Head and Begin the Body
Notes:
- #sc (eg. 2sc, 3sc, etc) shows the number of scs to be completed in the indicated st
- sts listed within brackets are to be worked in the same st. Eg. (Sc, hdc)
- I highly recommend using a stitch marker to help keep track of the rounds
- All rounds will be continuous (unless otherwise stated).
- When changing colours, end off previous colour unless noted otherwise.
Check out the Bundle on Ravelry or Etsy!

Start your Snowman Candy Cane Ornament Crochet Pattern
Snowman Ornament Body/Head:
The head/body is created in continuous rounds beginning with the head
Using White, create a Magic Ring
Round 1: 6sc in the ring (6)
Round 2: *2sc* 6 times (12)
Round 3: *sc, 2sc* 6 times (18)
Round 4: *sc in the next 2 sts, 2sc* 6 times (24)
Rounds 5-10: sc in each st (24)
Round 11: *sc in the next 2 sts, scdec* 6 times (18)
Round 12: *sc in the next st, scdec* 6 times (12)
See Video for assistance with the next 2 Rounds
Round 13: FLO for the entire round, sc in each st (12), do not end off…
- Place a stitch marker in the loop on your hook to keep it from pulling out.
- Place on a flat surface with the top of the head facing away from you and the last stitch sitting at the far right (far left if left handed) and ‘flatten’ the head down.
- If using – add safety eyes to Round 7 approx 4 sts apart
- Lightly stuff the head. Flatten down the head.
- Using a scrap piece of yarn and starting with the first and last st of Round 13, mattress stitch in the back loops of Round 12, across the opening.
- Continue working Round 14 from where you left off after Round 13.
Round 14: creating the arm holes *ch5, sc in the next 6 sts* twice (12 + 10chs)
Round 15: *sc in the next 5 chs, sc in the next 6 sts* twice (22)
Round 16: *sc in the next 9 sts, scdec* twice (20)
Rounds 17-18: sc in each st (20)
Round 19: *sc in the next 8 sts, scdec* twice (18)
Rounds 20-23: sc in each st (18)
End off, by slip stitching to the next st, weave in end.
Snowman Ornament Hat:
The hat is worked in continuous rounds from the top down
Using Black, create a Magic Ring
Round 1: 8sc in the Ring (8)
Round 2: *2sc* 8 times (16)
Round 3: working in BLO, sc in each stitch (16)
Round 4: *sc in the next 2 sts, scdec* 4 times (12)
Round 5: sc in each st (12)
Round 6: *2sc* 12 times (24)
End off, leaving a 12” tail for sewing.
Snowman Ornament Bow:
Made in a joined chain
Using Green, ch 6
Join to the first ch creating a loop. End off, leaving a 9” tail. Flatten the loop and wrap the tail around the middle to create the centre of the bow
Snowman Ornament Nose:
Made in 1 row.
Using Orange, ch 4
Round 1: ss in 2nd ch from hook, sc, hdc (3)
End off, leaving a 6” tail for sewing.
Snowman Ornament Scarf:
Created in a ch.
Using Orange, ch 4
Using Burgundy, ch 35
End off, cut ends close to beginning and end of chain.
Optional: Curly Cue Arms/Legs (make 2, if not using candy canes): Created in 1 row
Using Colour(s) of Choice, ch 36
Row 1: 3sc in the 2nd ch from the hook, 3sc in each of the next 34chs (105)
Note: for Striped look, alternate 9 sts 1st colour, 3 sts 2nd colour
End off, Sew on bells if desired, Weave in ends
Sewing Placement – I highly recommend pinning ALL parts in place BEFORE sewing to make sure everything sits properly and is to your liking 🙂
| Eyes (if not using safety eyes): Hot glue on the flat backed pearl or embroider eye/sleepy eye at approx. Round 7 about 4 sts apart. See video for assistance |
| Nose: Place centred below the eyes. |
| Mouth: If desired embroider on a mouth. |
| Hat: Place on head as desired, stuff lightly and sew in place. |
| Bow: Sew in place on the hat. |
| Buttons: Add or embroider buttons on the front. |
| Scarf: Tie in place around the neck. |
| Ornament Hanger Cut a piece of twine approx 6” long. Sew through the hat and top of the head. Tie a knot. |
| Arms/Legs Add your mini candy canes or curly cues into the holes made in Round 14 of the Head/Body. |
Congratulations!
You have now completed your Candy Cane Crochet Snowman Ornament Pattern.
Discover even more Christmas Amigurumi Crochet Patterns!
Quick Holiday Amigurumi Patterns That Sell Well at Markets
Have Fun with Candy Canes and Crochet Snowman Ornaments
Candy canes are a classic symbol of Christmas, and are a fun way to get festive with your holiday decor. I have a couple of great suggestions for including candy canes in your Christmas decorating. Starting with the Snowman Candy Cane Ornament!
- This snowman amigurumi ornament has mini candy canes as its arms and legs, making it extra cute in my opinion! Use it to hang from your Christmas tree, add to your door wreath or as an adorable addition to the gifts under the tree… and even sitting on table settings.
- As they are, you could arrange candy canes in small vases or mugs as festive centrepieces, or use them to frame wreaths and garlands around doorways. Hanging candy canes on the tree, interspersed with other ornaments, creates a fun mix of textures.
- Another unique way to display candy canes is to use them as place card holders at the holiday table. Tied with small ribbons and arranged in sets of three, they can hold name cards or mini signs, adding a sweet and personalized touch for each guest.
- You can also hang them from their included hook, from mantelpieces, windows, or even staircase railings to add Christmas surprises throughout your home. On Christmas day, you could send the kids on a candy cane hunt, to see if they can find them all!
We love seeing your finished projects. Tag us in your photos and posts using #DarlingMapleDesigns or @darlingmapledesigns.
Thank you so much for joining us! I hope you loved completing your Snowman Candy Cane Crochet Pattern as much as I enjoyed designing it for you. Don’t want to miss a stitch? Subscribe to the Darling Maple Designs newsletter and I’ll send updates for new pattern releases, sales and promotions straight to your inbox. See you again soon! Sara <3
If you have any questions or concerns with this, or any other pattern written by Darling Maple Designs, please do not hesitate to contact me at: info@darlingmapledesigns.com.
Don’t forget to Pin it to your project board.
Check out my other crochet candy cane ornament patterns!
- Santa
- Snowman
- Reindeer
- Kitty
- Dinosaur
- Unicorn
- Bear
- Puppy
- Mrs Claus
- Elf
- Mouse
- Moose
- Gingerbread Boy
- Gingerbread Girl
- Penguin
- Giraffe

